
To create the banner, start out with a star shape. Mine came from a pack of Melody Ross Chip Art chipboard stars.
First moisten the point of the star.

Then stamp various floral Images.

and repeat these steps on several of the star's points. (Each point will become one flag on your banner, so create as many as you need)

After letting the stamped images dry (I helped mine along with a heat gun) paint the points white with an acrylic gesso. I used a really coarse brush because I actually wanted it to end up a bit streaky.

Time to add your color. I love this part because I can match the colors to the papers I plan to use, creating a perfectly coordinated custom embellishment. I used slightly watered down acrylic paints...no need to be perfect, the flaws add to the folksy feel.
 When your color is dry it's time to antique it. I've heard that Modge Podge and dark paint work well, but I didn't have any Modge Podge, so I decided to use some paper glaze mixed with brown paint...it worked beautifully.
First slop it on liberally...

...then before it dries wipe it off, but not all of it. Let some remain in the recessed areas.

OK, now for the part when your star becomes a banner.
Cut off the points.

Check it...those star points become perfect little banner flags! Punch a couple holes for stringing and you are good to go.
 This card was pick up for publications and will be back up later :)
All Supplies GCD Studios unless otherwise noted.
DP: Melody Ross Artsy Urban, Chipboard: Melody Ross Chipart stars, Tools: Melody Ross Chip Art Tools including Mini Shapes, Bloom and Flourish, Epoxy Buttons: Melody Ross Artsy Urban, Kraft: The Paper Co., Alphabet Stamps: Technique Tuesday, Ink: ColorBox Pigment in Cranberry, Paints: Plaid, Gesso: Liquitex, Paper Glaze: Aileens, Crochet Thread: Coats and Clark
Size: 5x5
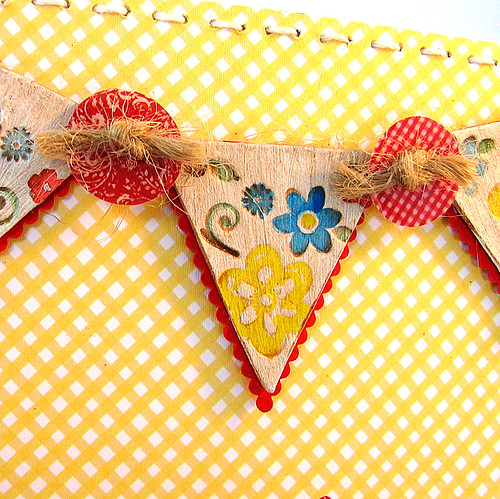
I decided to also mat my banner flags with some red cardstock that I took a pair of decorative edged scissors to.
I kept the over all design really simple so the banner could be the star. You can really see how I matched my colors to those beautiful GCD Studios Melody Ross Artsy Urban Papers.
Here's another card where I created a banner in essentially the same way.
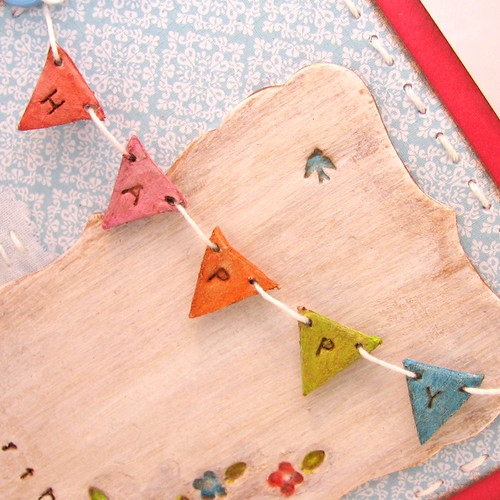 The difference here is that instead of leaving the background white I colored it with acrylic paint. The other steps are the same.
 All Supplies GCD Studios unless otherwise noted.
DP: Smoothie Shoppe, Chipboard: Melody Ross Chipart stars and Medium Plaques, Tools: Melody Ross Chip Art Tools including Chickadee alphabet, uppercase, lowercase and Mini Shapes, Buttons: Melody Ross Artsy Urban, Paints: Plaid, Gesso: Liquitex, Paper Glaze: Aileens, Crochet Thread: Coats and Clark, Trim: from stash
Size: 5x5
And, of course, the same steps were taken to create the paint treatment on the plaque too. You see what I mean about matching the colors to the paper...LOVE that!
Thanks so much for taking the time to read my little tutorial. I really hope you enjoyed it!
Have a great day everyone,
Heidi V
-----------------------------------------------------------------------------------------

Also here is a new project from our April guest design artist.
Thanks Laura for this BEAUTIFUL idea! It's so perfect for a side table!
~H
woot woot...I was thinking that was looking like a Heidi V creation...a-stinkin-a-dorable!!!! I cannot get enough of banners!!!
ReplyDeleteLove Laura's project too!
Oh My Goodness....wow...this is so much creativity going on in one post..these projects are gorgeous!!!
ReplyDeleteAll kinds of inspiring goodness here! So excited to play with those new tools also!
ReplyDeleteoh my word.... these are both AMAZING!!
ReplyDeletewowzers!!! LOVIN' those banners and how you used the tool!! AMAZING!! Thanks for the tutorial!
ReplyDeleteThose cards are beautiful!!!!!
ReplyDeleteLovely project by Laura as well!
WOW!! You are a creative genius!!! Looooove your cards:-) And Laura, that is so elegant and beautiful!! Stunning work ladies!!!
ReplyDeleteBeautiful work! All 3 are gorgoeus!
ReplyDeleteWow!! Do gcd designers ROCK or what!?! Great work ladies :)
ReplyDeleteLaura
What an awesome project. TFS
ReplyDeleteWow!!! Fabulous work ladies!!!!
ReplyDeleteWow! Fantastic projects!! Where can I get this tool??? I need one!
ReplyDeleteSO SO cute!
ReplyDeleteFabulous project and tutorial Heidi!
ReplyDeleteAnd another gorgeous project from Laura!
Love them both!!!
love all of them!!
ReplyDeleteHeidi - your cards are STUNNING!
ReplyDeleteLaura, what a cute, cute project!
oh Heidi! I love love love that you made the banner points from a star- sooo creative- and the cards are STUNNING!
ReplyDeleteLove the bucket, Laura ! :)
ReplyDeleteand Heidi that's such a clever idea !
Fabulous Heidi! Love what you've done with that tool. Beautiful bucket Laura! Great work! xxD
ReplyDeleteThanks for letting me know where to purchase this tool. Unfortunately they don't ship to Canada.
ReplyDeleteawesome! love it and I love a new tool. Oh bother I could be in trouble. Tee hee
ReplyDelete