4.30.2013

A Really Pretty Spring Layout

Hello Crafters! I am sooo excited to present to you my first project that I created as a Design Team Member for GCD Studios!  I can’t even begin to tell you how much I LOVE this stuff!!  If you haven’t gotten your hands on it yet, you need too! :) 
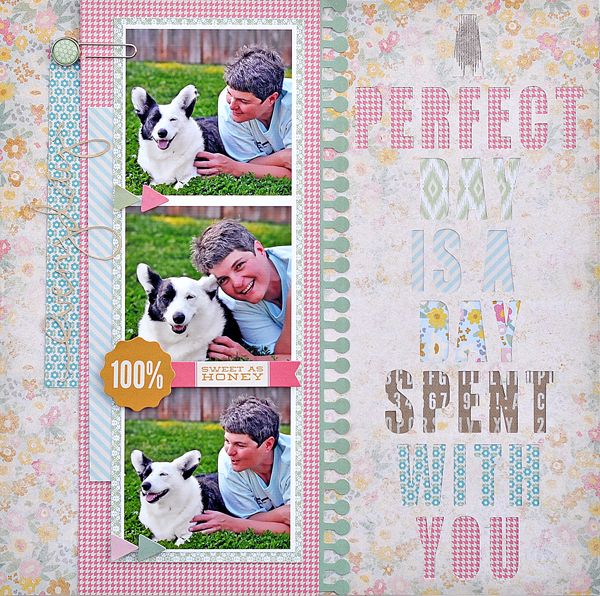
Fun Spring Memories
For this layout, I wanted to showcase how to use multiple photos on a layout without having to create a double page.  I struggle with double page layouts so this is a perfect solution for me.  
I use a free photo editing program online called Picasa.  Picasa allows you to create collages with a variety of choices.  This program allows me to get 6 photos into a 5x7 allowing me enough space to create a one page layout without over crowding. 

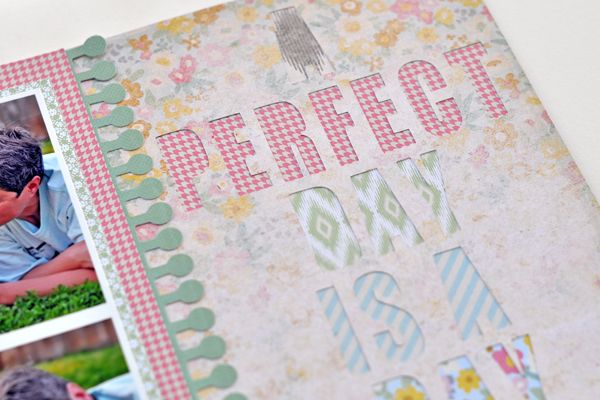
The Nostalgia Cutouts were prefect to add dimension to my layout.  I fussy cut some of the flowers and popped it up and added the adhesive pearls from Kathy Davis’s Ambrosia and Happiness collection. 


It all went together great!

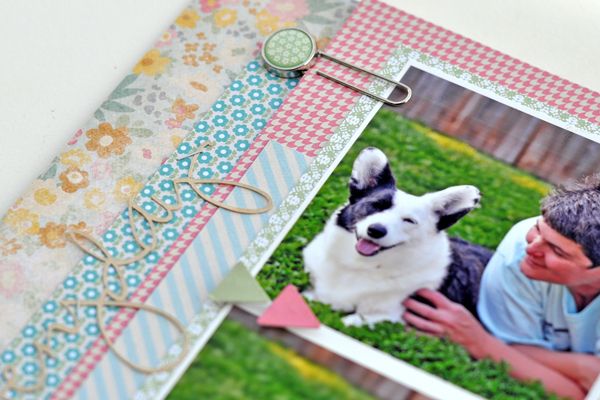
GCD Studios supplies: Nostalgia Flourish in Red (#1993) and Floral Tile papers (#1989), Nostalgia Cutouts (#1992), Donna Salazar’s Fun & Funky Chipboard Alphas (#2106), and Kathy Davis’s Ambrosia Adhesive Pearls (1886 & 1887) & Glitter Epoxy Dots (#1868) Adhesive Pearls. Other:  washi tape, ribbon and pins.

4.29.2013

A Perfect Day with Pure Bliss

Katrina here and I wanted to share a layout today that I made with the Pure Bliss collection. This was a fun and fast layout to make by just adding a few of the embellishments that are in the collection.

 photo K_HuntAPerfectDay600.jpg

I used different pieces of the pattern paper to back my title with.  And that fun notebook die-cut border was a fun and fast way to create a break from the title to my pictures.

 photo K_HuntAPerfectDayTitle600.jpg

There are fun paperclip embellishments in the collection also.  I had a hard time choosing which one I wanted to use on my page.

 photo K_HuntAPerfectDayClip600.jpg

I like to combine my stickers and my my own little embellishment clusters.  A fun thing to do is to cluster and pop them up with dimensional adhesive.  I usually do this with all my stickers, so that my page isn't so flat.

 photo K_HuntAPerfectDayStickers600.jpg

Thanks for coming by.  I hope I gave you some ideas on how to create a fun title (and use up those scraps) and how you can make your stickers go farther and look great on a page!

Supplies: 
Pure Bliss Collection-Paper #2018, #2019, #2020, #2021, #2023, #2024, #2025, #2026; Paperclips #2035; Borders #2036; Label Stickers #2033

Other Supplies: Cardstock, Silhouette Cameo


4.28.2013

A Fun Layout with Special Delivery


Hey all my GCD gals...have you been loving all of the new collections and awesome projects made by the design team?  Oh my...I know I have!  Guiseppa here, to share with you another fun collection and the project I made with it.  This one is Special Delivery by Heidi Sonboul.  This collection has such a fun mix of colors with a retro style.  So, when I first saw this...it reminded me of my cruise last January and I new these pictures were perfect.


I did a lot of layering on this layout.  I also added some flowers and leaf sprigs.  The colors of this paper were perfect and gave this layout that Caribbean feel.


Fun right?  This collections can be used for so many different projects.  I can't wait to do a layout of my boy with it.  Hope you enjoyed my layout and thanks for stopping by.


4.27.2013

Fresh Ideas


Having fun yet? Thanks for joining me! I am so excited you're back. This series is designed to help you dust off your tired 2012 paper crafting techniques, and show you fresh ideas for your card-making featuring paper from GCD Studios new 2013 collections.

Today's project features  a fresh idea for using a favorite project found in every paper crafter's stash; a punch, specifically a decorative photo corner punch. Featuring paper from Indian SummerI'm going to show you a fun way to use this punch to create a card that is full of bright and happy sunshine. Indian Summer has a beautiful muted color scheme with some fantastic prints that are perfect for any occasion. For today's card I wanted to make a sun-shiney card to brighten someone's day. 


Although, yellow is the main color, your don't want the card to appear flat by using too much color. After I trimmed sun and rays from Happiness and Ethnic Folk, and stitched them to the card. I used my photo corner punch to add depth to the card.


|1| Punch photo corners from Happiness and Ethnic Folk.

|2| Affix photo corners to the sunshine rays with foam tape, alternating patterned paper.

|3| Stamp sentiment on cardstock, trim and adhere to card with foam tape. Affix twine to card.

Don't be afraid to look at your favorite standard too in a new, fresh way! Experiment and play around with your tools, trying to find different ways you can use it.

materials

Come back tomorrow for another fresh ideas for your cards. Until then, think about what could you do with a photo corner and all the GCD Studios paper you could get your hands on!


4.25.2013

Flutter...Flutter Little Butterfly

Flutter, flutter! I am all aflutter over the colors and patterns in the Nostalgia collection by Diane Kappa! The bright colors and mix of both feminine and masculine components make the diversity of this collection so appealing to me. I chose to use the colors in my daughter's shirt with the pop of yellow for this layout.
The highlight of this layout are the plethora of butterflies flitting around the layout! I cut out the butterflies with my Silhouette Cameo and then backed each one with a different patterned paper. I then used the cut out's (waste not, want not!) and popped them a bit for some dimension on the page. 

In the process of pulling the butterflies off my mat, the antenna got a tad mangled. No problems! Memory Thread to the rescue!

I love the ease with which you can layer and create fun little clusters with the various patterns found in this collection! Pair that with a subtle tone-on-tone misting and your heart's aflutter!


Thanks for stopping by today!
Suzanna Lee Badge photo 2013-DT-Badge-Suzanna-Lee_zps66db7b91.jpg

4.24.2013

Cupcake Flowers For Spring

Hi friends, Grace here to share with you a new way to incorporate some non-scrappy items into your papercrafting projects.
Cupcakes are a big rage right now. They come in regular, mini and even extra-large ones. All sorts of flavors from the typical chocolate or vanilla to something exotic like Cayman Spice and Peanut Butter banana.
But even more fun are the cupcake liners that are available to us now. There are all sorts of colors and patterns to choose from. And that’s where my inspiration came from for today’s share.

I wanted to use my cupcake liners to create something unique for this wall decor altered craft. I decided to use the liners to create rosettes for the card. Read on to learn how to recreate these fun and easy rosette cupcake flowers…
1. The first thing I did was open up the cupcake liner and hand drew a spiral shape from the center going outside of the liner.
2. Then I cut along the hand drawn lines.
3. I used a dowel and rolled the liner starting from the edge of the cupcake paper all the way through the center of the paper.

4. I adhered the ends of the rosettes with glue gun to keep its shape.
5. No flower is every done without centers so I used some epoxy stickers from GCD Studios in the center of the flowers. I layered two foam adhesives inside the center of the flower before adhering the epoxy sticker to make the center flat and rose from the bottom of the flower.
6. I added some paint on the edges of the rosette flower to add more depth to the accents and also to show more of the crimpled aspect of the cupcake liners.

So there you have it, quick and easy way to incorporate cupcake liners on your next papercrafting project.Here's some more close up looks of my finished project.  


Live, Laugh, Love wall décor
Size: 5 ¼” square
Products used:
Nostalgia (#1987 Nostalgia Plaid red; #1986 Evening floral; #1992 Nostalgic Cutouts; #1993 Flourish in red); Happiness (#1868, Glitter Epoxy Dots)
Others: Glitter stickers, ribbon, border punch, photo corners, cardboard, cupcake liners, white paint.
Grace Tolman Badge photo 2013-DT-Badge-Grace-Tolman_zpsa3db2794.jpg

4.23.2013

Celebrate Spring With A Little Twig!

I love to incorporate unique items on my cards.  I've been known to try everything from silverware to coffee filters and more.  Today I am going to share with you a fun card using a twig on it and featuring the fabulous blues and yellows from the Nostalgia line.

I sent my kids out to hunt for twigs for this card.  I think they thought I was a little nuts!  I picked this one because it had some little buds on it that added in a second color. I decided to hand cut some little green leaves to add to it. 
 I added the twig to some simpler patterned paper so it would be more visible.
 Adding it then to a busier background paper that I just couldn't resist for this springy card!  I topped the whole thing off with a doily at the top to add to the soft feel of the card.

Have you ever used anything out of the ordinary on a card?  You should give it a try!  You might be surprised how much fun it can be!

GCD Supplies Used: Nostalgia Collection 6 X 6 Paper Pad #1998, Adhesive Pearls #1887


Christine Meyer Badge photo 2013-DT-Badge-Christine-Meyer_zpsfdd5245c.jpg

4.22.2013

Altering Those Photos


Hello paper crafting fans. Angi here with my debut on the GCD blog. I'd like to share a fun fact about myself - "altered projects are my thing"!


This altered project was so fun to make because I got to use the beautiful Nostalgia collection. The colors are so happy and lively. They are sure to make your projects shine.


I used some mini corrugated pieces to make mini wall hangings for my craft room. I even made my own custom buttons using the Nostalgia paper. Using a scallop circle and butterfly punch helped to add some extra added touches too. There are so many fun things that you can do with this beautiful collection.


Have a Happy Crafty Day!
--- Angi ---

Supplies: (Nostalgia Collection) - Circular Floral #1990,
Nostalgic Cutouts #1992
Other supplies: Epiphany Crafts button tool and button caps
Angi Barrs Badge photo 2013-DT-Badge-Angi-Barrs_zpsf8aeb313.jpg

4.21.2013

Live Laugh Love

Hi there!

Today I'd like to share a card created with the beautiful new Nostalgia Collection from GCD Studios.

Supplies: 
Cardstock: (white) Georgia-Pacific, (yellow) Bazzill, Patterned Paper: (Romantic Garden, Nostalgic Cutouts, Nostalgic Plaid, Red, Flourish in Red, Flourish in Blue from the "Nostalgia" collection) GCD Studios, Ribbon: Offray
Size: 4.5"x6.5"

Nostalgia is full of warm happy colors and classic images like plaids and florals.  The "Live Laugh Love" panel cut from the "Nostalgic Cutouts" patterned paper makes a perfect centerpiece and I finished is up with a few flowers and leaves cut from the "Romantic Garden" paper.

Have a beautiful day and remember to "Live, laugh, love"!


4.20.2013

A Happy Little Jar

Tegan here today and I have more of the Sunkissed Collection for you!  It reminds me of a bright sunny day- and you can't go wrong with that!  I also am in love with canning jars lately and they remind me of summer, so why not decorate one up right? 
I simply adhered patterned paper around the middle of the jar.  And decorating it with the Sunkissed Collection was so easy! 
Don't forget to decorate the top as well.  Simply trace the metal lid onto the paper inside the ring and adhere the paper down.
You can use this as a party favor or give it to anyone that makes you happy!  :D
I cut out the letters from the Beach Towel paper to spell "you" and "happy".

Have a great afternoon!
Supplies: Sunkissed Collection- Tickled with Sunshine (2065), Beach Towel (2064), Pretty Swimsuit (2061)

Tegan Skwiat GCD Studios DT, 2012 GCD Studios Layout Gal

4.19.2013

Hello April/May Issue :)

 photo GCDStudiosThePaperCutSpring13CoverLarge_zps3cb84201.jpg

I am so excited about this issue...being that our new team worked so hard on it. 
The pages are filled with gorgeous projects themed around
 Earth Day, Mother's Day and Teacher's Day
So there is a little something for everyone.
I always wanted to thank the new team for being so wonderful! 
It's only been a month and I'm already so proud of their hard work!


Pattern Paper Into Embellishments

Spring has FINALLY arrived!  It's been a relentless winter here in central NY state!

Nothing helps get you into an springtime mood better than some springy papers and some cute photos!  These are my kiddos on Easter Sunday, which happened to be a decent day.  I challenged myself to use a LOT of patterned paper on this page because there were so many pretty springy prints and a great mix of tone on tone and patterns.  I think I have TEN different patterns on here!  :)
Of course I had to fussy cut out some flowers and I added some Glitter Epoxy dots to the center.  The leaves I cut with my Cricut.
On my alphas, I wanted them to be a tiny bit more blue, so I went over them lightly with a blue ink pad.  The heart I die cut on my machine, too.
I love having lots of layers, and these square brads and the paperclips add just the right finishing touches!
Hope you are enjoying your spring!

-Audrey Yeager

Supplies:
Nostalgia Patterned Papers: Romantic Garden (#1985), Evening Field (#1986), Nostalgic Plaid, Red (#1987), Flourish in Blue (#1988), Nostalgic Cutouts (#1992), Nostalgic Plaid, Blue (#1996)

Pure Bliss Brads (#2034)
Pure Bliss Paper Clips (#2035)
Kathy Davis Happiness Glitter Epoxy Dots (#1868)
Family Jeans Chipboard Alphas (#2090) Audrey Yeager Badge photo 2013-DT-Badge-Audrey-Yeager_zps1a6cde23.jpg

4.18.2013

A Darling Side Table Project

Hi everyone!  Amanda here today with a pretty altered frame that is perfect for spring.  


I started with a brown, foldable frame that you can find in just about any craft store.  I love the yellows and pinks in the Nostalgia collection and chose to use only those colors for this frame.  After I painted the edges with a soft white, I cut and adhered the plaid paper to each side of the frame. 


The live, laugh, love journaling card sentiment was a perfect fit for this frame.  Wanna know a crafty secret?  I rarely use Mod Podge for the types of projects.  A good, permanent tape runner does the trick just fine.  


I die cut roses and leaves and adhered them to the corners of the frame.  I gently turned back the petals of the flowers to help them bloom.  


I repeated the bouquet of roses on the other side to balance the frame.  Be sure to check out the entire Nostalgia collection because it also has a blue and green plaid that would be perfect for boy projects, too.  

Have a great day! 

Supplies: From the Nostalgia Collection: Nostalgic Plaid, Red 1987, Nostalgic Plaid Blue 1996, Flourish in Red 1993, Floral TIle 1989, Nostalgic Cutouts 1992