5.20.2010

"think outside the box"

I was so inspired by Heidi V's "not just a star" card last month that I wanted to challenge myself to "think outside the box" and use something as it wasn't meant to be.
I love these fun chipboard wings and a set of them just screamed {clouds} to me.
Photobucket
Photobucket
Using the new Chipboard Art Tool by Melody Ross, I added a bit of texture to my "clouds"...
Photobucket
added them to my layout...
Photobucket
a whole new look for these set of wings...
Photobucket
Challenge yourself today to "think outside the box"!
Supplies:
Kraft cardstock
Pattern Paper: gcd studios: Ava Collection & Artsy Urban
Fiskars punch
Chipboard letters: Cosmo Cricket
Buttons: Sassafras
gcd studios: Chipboard Tool & Chipboard Wings

5.19.2010

Polymer Clay Embellishments

Our Winner for RWW:


Remember:
To qualify for our RWW give away... sign up for our google follower to the right :)

--------------------------------------------------------------------------------------------


I thought it would be fun to try to make my own polymer clay embellishments and as I was playing, a light bulb went on...how fun it would be to use the chip art tools to press in a fun pattern into my clay! Here is how I did it:

1. Flatten your clay with a roller (I didn't have one, so I just used the palm of my hand)
2. Cut out desired shape (the spray bottle lid was the perfect size for me)
3. Press the tool into the clay - no hammering needed here:-)
4. It is now ready to bake following package directions on clay.


For my "congrats" card I used paper from the Smoothie Shoppe Collection as well as the Homespun Chic collection. The word strip is also from the Homespun Chic collection and, course, the chip art tools.

Next, I thought it would be fun to use my Peacock Alphabet to spell "love" and I used paper from the Artsy Urban and Homespun Chic collections.

I hope you try this!! Have a great day!!


5.18.2010

Rich layers of colors

Hi it's Kim here with my interpretation of this month's theme ...

theme photo

I have taken my inspiration from the rich layers of colours that work around a central plain space - and I have interpreted that by making a detailed "quilted" background that works around the central plain spot of the journaling page.

This image was pulled for publication

I have then included details in the journaling space, just like the dolls have details in the center panel on their stomachs.

Here is a detailed shot of the quilted background ...

theme - creative kids (5 of 5)

I finished the layout with one of the beautiful antique style buttons and some of the chipboard word strips - definitely a favourite product of mine!

All of the GCD products on this layout are from the Homespun Chic range by Melody Ross.


Other products - American Crafts letters, Bazzill cardstock, Glimmermist by Tattered Angels and Kaiser pearl.

I hope you find lots to inspire you with this theme!

Cheers
Kim :o)

5.17.2010

Take the "bull by the horns"


Happy Monday morning everyone!

To start the week off right... here is a beautiful card from our Guest designer Jen J. and a FUN project from Lori R :)
~H
---------------------------------------------------------------------------------------------
At first, I was taken back by this months challenge. I didn't feel like I was artsy enough to create something that would do the challenge justice. Soooooo, I decided to take the proverbial "bull by the horns" and embrace my artsy side. Which in all honesty......isn't much. But I gave it a whirl anyway! That's the joy of challenges. They get you out of your comfort zone and make you think, think, think!!! That's what I love about them!

Without further ado. Here's a little tutorial I created with directions on how to draw a Russian doll and create a template by hand. I hope you enjoy!!


~~~~~~~~~~~~~~~~~~~~~~~~~~~~~~~~~~~~~~~~~~~~~~~~~~~~~~~~~~~~~

Supplies: cardstock: stampin up (white, pacific blue), Patterned paper: artsy urban (gcd studios), Punches: 2 and 1 1/4 inch (stampin up), rhinestones: zva creative, alphabet stamps: just rite stamps, ink: stampin up, sentiment: SRM stickers, other: scalloped scissors, flower

5.16.2010

Yes! That is a popcorn box!

This month our theme inspiration piece is all about nesting dolls! I have always thought they were really cute, but after using them for my inspiration this month I think I have found a new love affair! Shhhh...don't tell my DH! lol!
This is the image we were given to work with...
Don't you just love all the fun colors and shapes?! It certainly got my mind to working! The shape however was my biggest struggle. What could I alter? I knew I wanted to make my own version of a nesting doll, but I knew I did not want to go with the traditional shape. So, I decided to take a trip to Hobby Lobby and peruse the isles to look for ideas.
That is when I came across this...
Yes! That is a popcorn box! They were available in 2 sizes in the party favor isle! As soon as I saw them I knew it was just what I was looking for!
So from this popcorn box I created these...
A sweet little trio! Mommy and her 2 baby girls! I went to town decorating the popcorn boxes with the Melody Ross Artsy Urban line! These papers are perfect because of the fabulous linen/cloth-like look and feel they possess. Plus the colors are so warm and cheery!
Here is a close up of the Momma's pretty face...
and the front of her dress.
Supplies:
GCD Studios
Patterned Paper: Artsy Urban/Blue Floral, Petit Floral, Postcard 1, Postcard 2 and the 8x8 Specialty Paper Pad
Embellishments: Artsy Urban/ Crochet Flowers, Vintage Buttons, Layered Chipboard Flowers

Other:
Decorative Edge Scissors by Fiskars; Cardstock by Bazzill; Ink by Ranger; Paint by FolkArt; Ribbon unknown; Butterfly Punch by Martha Stewart; Gems by Bazzill and Me & My Big Ideas; Popcorn Boxes by Hobby Lobby.


I hope you were inspired and that someday soon you will find yourself inspired to work a nesting doll into your next project. If this happens, I would love for you to share your projects with me! Thanks for stopping by!

Happy Hugs!
Juliana

5.15.2010

Plastic Template

Hi it is Kim here to share with you a technique for creating texture on white core patterned papers.

I am not a big user of plain pattern papers and when I was working on this layout, I wanted a way to "dress up" the plain blue paper that I really wanted to use on one of the pennants.

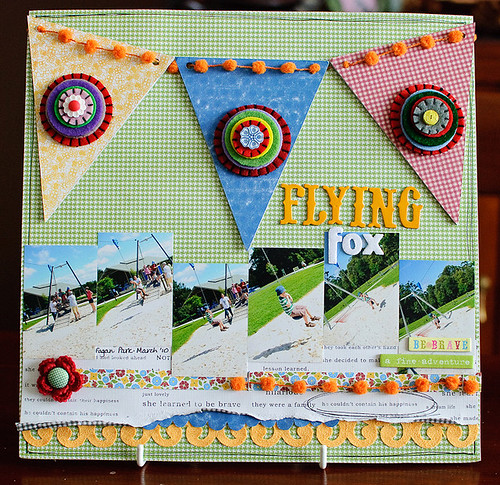
This is the layout ...

technique - flying fox (1 of 4)

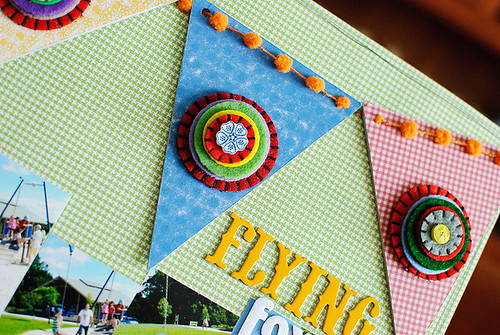
and this is a close up of the pennant in question ...

technique - flying fox (2 of 4)

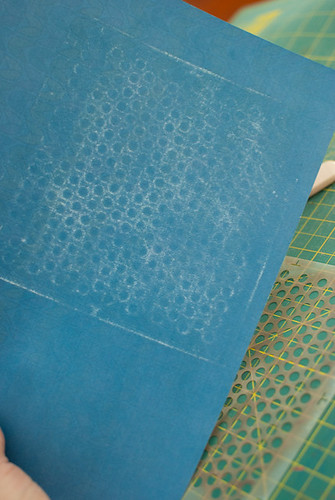
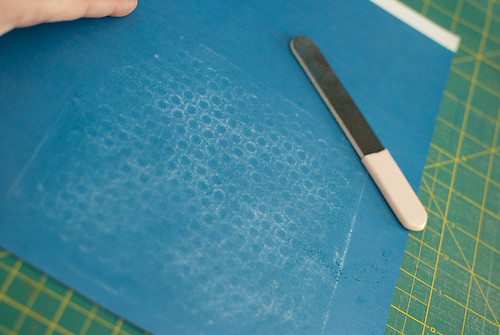
The paper was originally a plain blue paper and by putting a plastic template under it and sanding it with a large emery board, I was able to create a soft polka dot design on it. It is so simple but effective!

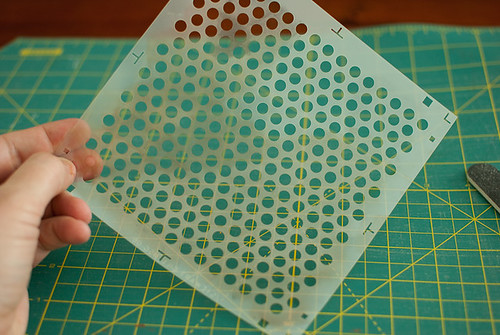
Step 1 : select your template, I chose a dotty one

Technique step by step photos (1 of 5)

Step 2 : place under paper and holding paper in place sand across the surface of the paper.

Technique step by step photos (3 of 5)

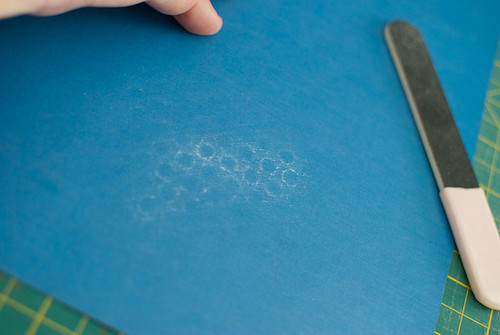
Step 3 : you will end up with this type of pattern!

Technique step by step photos (4 of 5)

Step 4: use your paper however you want - I chose to cover one of the large chipboard pennants from this set and then use it in the super sized pennant banner at the top of the layout. It is a great way to bring new interest to a plain piece of white core pattern paper

Technique step by step photos (5 of 5)

All of the GCD papers and embellishments in this layout came from Artsy Urban, with a touch of Homespun Chic and Zippity Collection.

Other products: Thickers by American Crafts, bauble ribbon from stash.

I hope you have an opportunity to try out this easy but effective technique soon to make a change to a piece of patterned paper in your stash!

Cheers
Kim :o)

5.14.2010

Bagging Good Fun

Hi everyone!

Teri here, and I've been "bagging" Heidi to let me come back and share a new technique with you.

Hee hee. :) Just kidding.

But I'm totally excited to to show you today a few new and fun ways to use the gift bags from Melody Ross' Homespun Chic collection on your cards and scrapbook pages.

First, if you haven't seen the bags before, click here for a peek. GCD Studios makes four different kinds. Each is clear plastic with a design printed on it. I am partial to the blue houndstooth print. It's "oh la la" worthy.

The bags are great to use as they come for wrapping gifts and special treats. But you need to prep them first when you want to use them on cards and scrapbook pages.

You do that by:

1. Setting a bag in a paper trimmer and cutting off the sealed end.


2. Taking what is left of the bag and using your scissors to cut down the seam. Unfold the bag and you'll have one really long rectangle to work with.


You can really go to town.

You can use the bags like patterned paper.


I applied clear adhesive to my card base here before I applied the bag piece to it. Once applied, I rubbed my hand over it to even out any wrinkles.

And here's how the whole card looks.


You can also use a bag to make a pretty window.


I cut a hole through my card and then mounted a piece of the bag inside the card.

And here's how the whole card looks.


Besides these two ways, you can also diecut and piece pieces of the bags together to make flowers and cut them in strips to make ribbon.

Thanks for stopping by. I'll be back again soon.

-Teri Anderson
for GCD Studios

5.13.2010

Vertically & Horizontally

This month's theme layout was inspired by nesting dolls – otherwise known as matryoshka dolls. I ended up going with a quilted look for the patterned paper that I used on this layout. I punched out squares from various GCD Studio papers from the Artsy Urban line and laid them down on the white cardstock. I then sewed down each strip vertically & horizontally. My photo, embellishments, & title were then placed on top of the “quilt”.


SUPPLIES USED:
1. Bazzill Cardstock - Black & White
2. Thread
3. GCD Studios
Artsy Urban Patterned Paper
Artsy Urban Glass Paperclip
Artsy Urban Layered Flowers
4. Martha Stewart
Green Baker's Twine
Royal Butterfly Punch
5. Oval Tag
6. Fontwerks Adhesive Label
7. American Crafts Thickers
8. Jenni Bowlin Circle Alphabet
9. Stazon Ink - Black
10. Technique Tuesday Acrylic Stamp
11. Pink Paislee Artisan Tape

Melissa Mann

5.12.2010

Each photo is placed just a little lower

The winner of our Random Winners Wednesday is....


Contact me at Hsonboul@gcdstudios.com with your info and please put RWW 1 in the subject line.

For those of you that didn't win this time, don't worry because we are doing this all May and June. Make sure you sign up for our Google follower.
-----------------------------------------------------------------------------------------------
Hi all! Mimi here! I just loved the theme this month of the nesting dolls! When my brother was in high school he was invited to wrestle in several countries including Russia. When he was there he traded a pair of jeans for 2 sets of dolls. I still have them...my kids loved playing with them when they were babies. I just love how they look all lined up, everyone just a little shorter than the last.

I decided to use that inspiration for my layout design. Each photo is placed just a little lower than the last. I think it really makes for an eye pleasing design.


For this layout I used the Artsy Urban Collection. I think its homey feel suits the design and nesting doll theme perfectly.


Here are a few details...you can not help but love all the amazing embellishments that come with this line.

Thanks so much for stopping by!

5.11.2010

7 different patterned papers on my layout

For the month of May, the design team was given this photo of darling nesting dolls to work with:

I loved all the patterns in the photo and decided to use as many patterns as I could and do some paper piecing to create a scene. In all, I used 7 different patterned papers on my layout. I love this photo of my daughters with their Easter baskets and the pinks and greens in the Homespun Chic collection matched their jammies perfectly!

I used a template to cut ovals from cardstock and then paper pieced each egg by layering patterned paper. I cut one of the Homespun Chic transparencies in half (loved those little chicks and they were perfect for an Easter layout) and used part of it on one of my eggs and the other part at the top of my layout.

I adhered patterned paper to one of the chipboard plaques from the ChipArt collection and decorated the edge with Stickles.

My egg title needed grounding on the page so I drew wavy lines on two patterned papers and cut them out. A little machine stitching and white paint and it's shabby Homespun Chic! Additional supplies used: American Crafts thickers, Stickles, Fiskar's punch Happy paper piecing! :)
Jill

5.10.2010

Happy Mothers Day!

Yesterday was the most perfect day, besides the food poisoning left over from Sat night lol.
When in doubt... DON'T EAT IT!

Anyways, today I have 2 post for you. You have already seen the GORGEOUS candles by Kristine and now, here is a BEAUTIFUL layout by our May guest design artist Jen J.

Photobucket
Check out this amazing boarder! I love all the different patterns and how she sewed them down! I just love this idea! Make sure to take it sometime soon.

Remember, On Wednesday I'll be picking a winner for Random Winners Wednesday. So make sure you are signed up for Google follower to qualify.

Happy Monday everyone!
~H

I used Artsy Urban Butterfly

Hello! Kristen here with a post on making those gorgeous patterned papers into stunning 3 dimensional embellishments. I have used these gorgeous butterflies on some artsy decor candles. Don't they look ready to fly off the candles?

I first layered patterned papers to make wraps for my candles. Then I added a scalloped circle and adhered that to the middle of my candle.

First, you will need patterned paper with a solid pattern. I recommend flowers or animals. Butterflies aren't animals, but they work perfectly with this technique. You need two of the pattern you plan on using.
You will fussy cut out two of the image. I used Artsy Urban Butterfly for my image, luckily there were two very similar butterflies on the paper.

First, you will fold the butterfly in half, lightly pinching the middle to hold the wings away from the base image. Then you use a glue dot to adhere just the middle part of the butterfly to the second butterfly. At this point, you can adhere your butterfly to the background wrap of the candle.
Here is the second butterfly candle, with two smaller butterflies. You can embellish your butterflies as you'd like. I chose to use a black gem in the middle, adding small phrase strips to the wings.

To finish my candles, I added twine and buttons tied to the top of the candle. I also added a couple more word phrase strips to the candle


Supplies used- gcd studios ( Artsy Urban collection- Butterfly, Blue Floral, Book Page, Postcard2, Colored Birds and Vintage Buttons)

Thanks for checking out my artsy candles today!
Kris

5.09.2010

Patchwork

Hello everyone! It is my turn to show you how this month's theme inspired me... What I love most about these images is the patchwork-like colors, the homespun feel and the floral and scalloped elements.
My two cards birthed from this inspiration...
Patterned papers (Ava, Homespun Chic and Zippity collections); tools (Chip Art Tool and Chickadee Alphabet & Flourish stamps); border punch (Martha Stewart Crafts); flowers (Prima & Zva Creative); ribbon (Michael's Crafts); other (thread)
Patterned paper & fussy cut butterfly (Ava collection); flowers (Prima & Zva Creative); stamp (Hero Arts); other (thread)
Have a great one!