4.10.2013

A Beach Bag Card You'll LOVE!

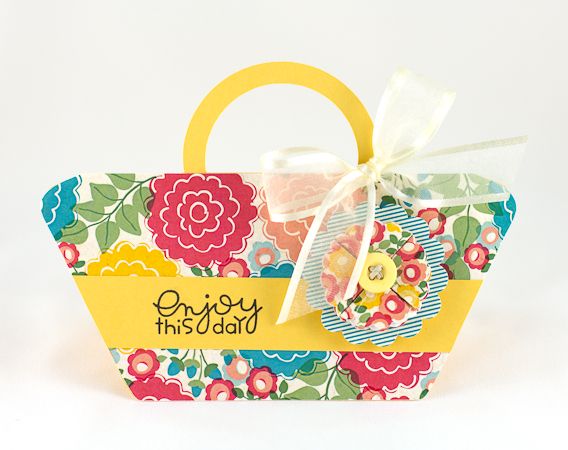
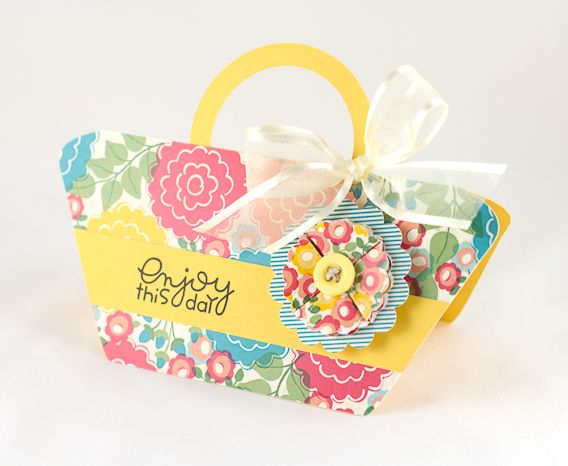
Hello everyone! Nina here to share my CHA project using the Nostalgia collection. The bright and happy colors and patterns remind me of lazy summer days so I made a beach bag shaped card:


Supplies: All paper from Nostalgia collection. Romantic Garden paper #1985; Flourish in Red paper #1993; Nostalgic Cutouts paper #1992.

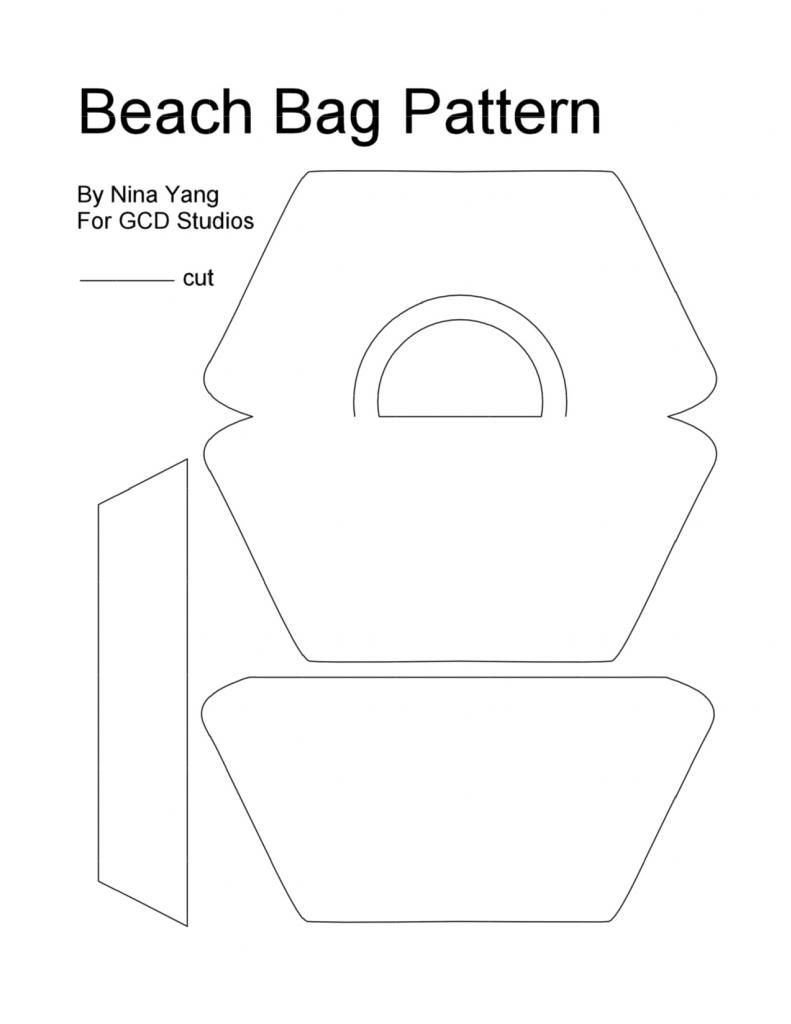
You can download the patterns at the end of this post. The focal flower were made by layering double-folded scalloped circles together.


Thank you for stopping by! Happy Crafting!
Nina Yang GCD Studios DT, 2012 GCD Studios Card Gal

4.09.2013

Scrap Your Month

One of my favorite papers in the Sunkissed line is Calendar Girl. I just had to scrapbook a photo of my darling little niece in her bright pink swimsuit from this past summer:


I filled four squares with her photo, then began adding bits and pieces to the other squares. I filled some with patterned paper, some with fussy-cut flowers, some with punched shapes, and others with journaling.


Of course, the title needed to be a play on the calendar, so I chose June Bug. She is cute as a bug, and the photo was taken in June, afterall.


Sunkissed is the kind of collection that makes me want to have a little girl - cute, fun, and sweet. Kudos to Heidi Sonboul for creating such a yummy collection!


GCD Studios Supplies Used: Sunshine #2056, Pretty Swimsuit #2061, Calendar Girl #2066, Tickled with Sunshine #2065.

4.08.2013

One Darling Girlie Layout


Hi there! Today I'm sharing a layout I made for CHA with the new Nostalgia collection. Love the colors in this one, perfect for girly layouts and projects!


Thanks for stopping by and I hope you enjoyed this layout.
Jennifer Chapin 2012 GCD Studios DT photo JENNIFER-CHAPIN.png

4.07.2013

Cute Chevrons

Hello and good morning..

It's Wendi here, sharing a fun summer page with you. And if your like me, you are MORE than ready for warm, summery days to come back, and take some time to get out and play in the pool. I created this layout, using the lovely Indian Summer collection. I am totally drawn to the color pallet in this line, lately it's been one of my favorites.

I created a fun pool page of my daughter swimming.. If it's one thing my kids love to do in the summer, it's to go swimming!!! I can barely get them out of the water, whether at the pool or beach.
When creating this layout, the chevron paper jumped out at me, and I decided to not only use that as my main pattern, but to also create a chevron pattern, mixing and matching the other papers.

First I measured and cut 3/4" long strips of paper, and then cut 1 1/2" strips to create my chevron pattern.
also inserted triangles to fill in the top of the chevrons, to keep the pattern flowing through the top of the page:
I added machine sewing on the pattern and through out the layout:
I continued the triangle pattern and added a few of them at the bottom of the page:
So make those patterns work for you on your page.

Have a wonderful day.
Supplies:
Paper: Indian Summer- Modern Chevron, Fancy, Holland, Zig Zag.

Other: Cardstock, Alphas, Mist, Bling and Machine Stitching.

4.06.2013

This Collection Great For Boys

Congratulations Tracy Schultz GCD
I love collections that are upbeat and fun, and a little bit funky. Because that means you can use them for virtually anything! The blues and greens here make this collection great for boys, naturally. But you can also use it for anything from travel and vacation cards and books, to thank-you cards, birthday cards, and the like.
  Congratulations close-up Tracy Schultz GCD

Here, I focused on the adorable little postage stamps in the collection to make a congratulations card. These stamps are so fun- and you get an entire sheet of them! [Supplies- GCD Special Delivery collection; Stamps- Paper Smooches Sentiment Sampler; Ink- Memento Tuxedo Black; Accessories- Creative Impressions green glimmer ribbon, dimensionals, CSS favor flags die]


4.05.2013

Bright and Happy


Good morning GCD fans, Guiseppa here to share with you a layout using the new Nostalgia Collection by Diane Kappa.  This collection is fun and bright and just rings summer.  Some of my favorite things about this collection is all of the fun flower prints along with the color scheme.  Let's take a look at my layout!


Since I just adore the all the fun flower patterned paper...I wanted to incorporate a lot of it on my layout.  So, I cut out strips of paper...cutting a triangle at the ends.  


I used the cutouts to make my title and added some flowers...cutting them from my Silhouette.


I created a few more subtitles from the cutouts and added more flowers.  I used foam adhesive to give my layout lots of dimension.


Thanks for stopping by and I hope you are enjoying all of the new collections and the design teams creations!  So much inspiration going on here at GCD Studios!


4.04.2013

A Charleston Card

"Charleston, and Charleston. Charleston, and Charleston..." went a swing dance teacher last summer, so while I was making my card using Diane Kappa's new Charleston collection, I couldn't help hearing that play in my mind. ;)


I used many of the elegant patterns to create another pattern of circles to provide the backdrop for this beautiful flower...


Maybe next time you look or play around with this line, you'll have something similar dancing around in your mind. ;)

Thanks for stopping in today! :)


Blog: http://bearydocardsinc.blogspot.com/

4.03.2013

Made Fresh Part 2

Thanks again for joining me in me as we head into day four of Cards Made Fresh Series! I am so excited you're back for more fun cards. This series is designed to help you dust off your tired 2012 paper crafting techniques, and show you fresh ideas for your card-making featuring paper from GCD Studios new 2013 collections. Today, I'll be sharing a  card with you that showcase the lovely collection of Sunkissed. This collection is filled with fun, summery images and a fresh color scheme of blues, peaches and greens

Today's card explores the style of collage in your card making. Collage is the layering and overlapping of images to create a cohesive design and composition. Layering products is a fresh new style in paper crafting. Often seemingly unrelated paper, trims, embellishes and stamps can work together beautifully, by layering them one on top of the other!
|1| Start by embossing your cardstock base with embossing folders. Experiment with collage by trimming patterned paper blocks, punching patterned paper with starburst circle punches, fussy cutting images and trimming patterned paper strips.

|2| Assemble your components by layering them together so that you have a strong focal point. Consider adding texture by incorporating ribbon or twine, like I've done here. I rolled some twine into a circle and then clipped it to the center of the flower.

One of my favorite ways to use collage in my card making is too simply pull patterned paper from different collections, ribbon and alpha stickers along with my favorite punches and experiment with layering one on top of the other until I find a composition I like. What can you use from your stash to create a collaged card?

materials

Oh, and I have two more cards I'll be sending a pub form in for, plus one more that's on the cover of Paper Crafts Magazine March April. I'll also include my publication form for CHA payment, in case you didn't see. Monique had mentioned not getting it, and I know CHA was a busy time

4.02.2013

A Cute Banner on A Layout

Hello and Good Morning,

It's Wendi here, and I'm sharing a FUN layout with you, using the exciting Sunkissed collection from Heidi.  I was overjoyed to see this line, since I'm completely a summer and beach girl at heart, it's perfect for lots of the photos that I scrap.

I had some older photos of my daughter out roller skating, and LOVED the cute roller skates from this line, and was inspired to use them for my layout.
I cut out banners for underneath the border strips, and matted them with white cardstock:
I laid them out and then added the "say cheese" paper strip:
I also added a girlie handmade spiral flower and added some bling:
I also worked some triangles at the top of the page, to bring the focal point to the title work:
And there's my little skating cutie:
Isn't this collection tons of fun????

Have a wonderful day..
Supplies:
Paper: Sunkissed- Beach Towel, Lazy Days, Mama's Muumu, Oh Lucky Me, Sassy Swimmers.

Other: Cardstock, Machine Stitching, Bling.

4.01.2013

One Cool Travel Journal

Amanda here today with a cute, travel journal that is super easy to customize.  I used GCD Studios new Special Delivery collection to alter a plain kraft notebook.  This collection is perfect for any travel-themed projects! 


This little alterable journal measures just under 6" tall and is filled with blank, white pages.  I kept the cover fairly uncluttered because I thought it would be fun to add notes or make marks at different travel locations.  I stitched the papers together, but did not stitch them directly to the journal.  I used a super sticky tape runner to adhere the cover to the front of the journal.


The back of the journal has a print of the Eastern Hemiphere.  Wouldn't it be fun to mark the location of all of your travel adventures.  There is plenty of forgiveness in the print so if you live somewhere other than North or South America, you can have the continent of your choice be front and center on the journal cover. 


The corners and the binding are made from lightweight kraft packing paper.  It is more forgiving than kraft cardstock.  TIP: Stamp your custom title before putting it on the cover. 


The arrow and label marked the location of CHA this past January, but could easily mark the location of your next grand adventure.


This little journal had nothing more than blank pages so I added some fun and functional pockets and tab dividers.  

I covered the inside of the journal with patterned paper and stitched in a pocket.  I stuffed the pocket with some fun journaling cards.  
 
I die cut three tabbed dividers and adhered them directly to the blank pages.  These would be super easy to customize depending on how you would use the journal. 

I rounded the corners of a journaling card and added a notch to create a pocket for the back inside cover.  I fussy-cut a pair of glasses and put them in the just because.  The little elastic loop is perfect for holding a small pen.  

Although we are still in the throes of winter, have you started making your summer plans?

Supplies: Special Delivery collection; journal (Sierra Pacific); stamp, arrow (Studio Calico)