6.09.2010

School is out (JOY, JOY)

Is it really June already?? School is out (JOY, JOY)(for most of you) and it's the month we celebrate the fathers in our lives. Both events are special in my book. I enjoy my kidlettes being out of school. We usually have a long to-do list each summer. So far on our list. We have vacation (to a never been before state), summer reading program at library, baseball, camping, voice lessons, volley ball camp, church camp, Florida trip, garden (it's actually growing famously). Sounds like a summer of fun!
Father's Day becomes more special each year as our children get older. I enjoy watching my hubby interact with kids in such a wonderful way. Our children have been blessed with a father who is active in their lives. He goes on field trips, attends field day, cooks for the school cook out, helps with baseball practice and games, he's a good provider, attends church each service, makes sure they get the proper discipline, I could go on and on. He really helps make my job as a mom a joyful experience.
The inspiration this month evokes such carefree feelings. I was really pulled in by the hot air balloons. By the way they float so haphazardly through the cloudless, deep blue sky with such ease and beauty. I can hardly tear my eyes away from the bold colors and patterns. It's almost breath taking.


Needless to say, my first card was inspired by the hot air balloons bold color and pattern. I pulled some paper from the Smoothie Shoppe and Lydia collections. I added a Melody Ross chipboard tag, some bling, a doily, and a Melody Ross button. The flower was created with a scalloped punch. I have a small tutorial for it in the works.

Below is a close-up of the flower. The paper used for the flower is called Pinas (smoothie shoppe and the stems are called Linen (lydia collection) .
This card has many elements seen in the photos. The scallops (cloud necklace), green colors ( balloon), stripes (balloon), blues (sky), orange, bronze accents (dirt road and fields). How fun is that. Talk about inspiration. It's amazing what you can get out of a few photos.
Patterned paper used for this card. Smoothie Shoppe and Homespun Chic.

Since this is the month we celebrate our fathers. And masculine cards seem to be a bit of challenge for me. I decided to create something really simple but fun. I started out with a plain Kraft card base. I wanted to make a frame using score lines. To do that. Punch a square and use it to mark each corner. Then simply connect the lines. I then stamped a smaller panel with a wood grain BG stamp. Adhered it to the center of the frame with pop dots. To create the tie, I used a square punch and a straight edge. The "knot" is a square cut in half with each angle tucked under. I then faux stitched around the edges.
Patterned paper is Diamonds from the Lydia collection.

TSM for bearing with me this long. I guess I got a little carried away with this month's challenge. I just couldn't seem to stop myself!
My last project is for my sweet daddy. He likes to fly little airplanes and he thinks Snoopy is funny. It also matches his office. Which in turn will make my momma happy.
The paper is form the Artsy Urban collection. I also used Melody Ross Chip Art Tool and chipboard. I colored in the stars and DAD with Copics.

I hope your summer has gotten off to a great start! C-ya next month. BOOM Time! :)

~lori

6.08.2010

Subtle Texture

Hello, GCD Studios fans, it’s Leslie Davis here with a technique to
share today.

Since Father’s Day is just around the corner, I wanted to create a
scrapbook page honoring my husband and his love for our children.

Here’s the layout I created.


I was playing around with the papers I had in blue and found myself
admiring, yet again, the back side of the foil embossed paper from GCD
Studios and the wonderfully subtle texture. It reminded me of
the printed core embossed papers that are popping up everywhere right
now. Here's a peek at the foil side.


I got to work on the solid side with my file board, but any fine grit
sandpaper is fine. Sanding the paper removes some of color
bringing out the amazing texture of the embossed paper. I found it
worked best to move the file in a circular motion.


I love how the distressed paper makes a wonderful weathered background
for my beach photo. Here is a closer look.


Supply List
Papers: Book Page & Black floral (back)- Artsy Urban by Melody
Ross, Quilted (back)-Lydia Collection by Melody Ross
Embellishments:
Transparency Designs, Die Cut Boarders & Rhinestone Paperclips-
Artsy Urban by Melody Ross
Letter Stickers: Thickers by American Crafts and Mini Market
Stickers by October Afternoon
Other: Paper Tape by 7 Gypsies, Rhinestone stickers by Recollections,
Flower Centers by Prima, Felt Ribbon by Paper Studios, buttons
Ink: Daler-Rowney FW Acrylic Ink


Just in case you were wondering, here is a list of other GCD Studios
papers this technique would work with.

Teal Pinwheels, Ava Collection by
Melody Ross
Crosshatch, Ava Collection by Melody Ross
Fancy Stripe, Lydia Collection by Melody Ross
Quilted, Lydia Collection by Melody Ross
Gone Bananas, Smoothie Shoppe Collection
Smoothie Stripes, Smoothie Shoppe Collection


Hope this inspires you to get out your sanding tools and find those
hidden textures!
Leslie

6.07.2010

Guest designer day :)

It's Monday and I have another beautiful item by Jacquie.
Sorry for getting this up late today. I've been running around town all day getting ready for my boys double birthday party.

Anyways, Jacquie created this beautifully bright wall hanging. I just love the tissue boarder :) and talk about yummy layers! SHE rocked IT!


Thanks Jacquie
~H

6.06.2010

Circle Journaling

With Father's Day right around the corner it's likely that you are wracking your brain trying to figure out a gift for that special guy in your life. If you are anything like me, you're busy and sometimes finding the special gift gets accidentally pushed off until it's a bit too late.
I created this project for all of my procrastination friends :) Here's a quick little "man" gift (equivalent to a man picking up flowers) that with just a few key supplies he'll think you had this planned for days :)
Supplies Needed:
~ jar of nuts - any kind
~ GCD Studios Papers and Embellishments (I used Artsy Urban - it has great colors that are perfect for men).
~ Adhesive
~ Trimmer
~ Scissors
~ Ribbon
~ Printed Digi Stamp (I am sharing the one I created here in this post - so grab it for free!)
Here's the completed altered Jar:


So have you been wondering how you could create your own digital stamps? Well I am going to show you how using Photoshop CS3. Here's how I created the one I used on this little altered can.

Step one: Open a new file in photoshop. Size it at about 2x2 inches.

Step two: In the tool bar on the left hand size click on the custom shapes button and then at the top of your page click on the "paths" (see arrow)


Step 3:

From the pull down menu select any shape you wish. Your stamp will take on this shape - so choose one that you like.


Step 4: (I selected a basic circle) now draw out the shape onto your workspace - it will look like this when you are done.


Step 5: On the left hand side toolbar select your text button and click on the outside of your drawn out shape and start typing.


Step 6: You can adjust the size at the top using the basic sizing tools.
Step 7: (optional): I formed another layer and typed in "Happy Father's Day" in the center. I also drew out a few other circles using the basic "stroke" function to add a bit more interest to my stamp - here's the completed stamp. Now all I have to do is print and punch it out using my spellbinders or hand punch.

Do you like this digital stamp? Click HERE to download it for free!

Happy creating!

Jen W.

6.05.2010

So addicted to the metal plates!

Hello everyone , it's Emeline here ...

take a look at this collage of picture. It is the source inspiration for our theme projects for June. (time flies isn't it ?!) :)
I am so inspired by the intense and rich colors found here!


Since Father's day falls in June, I decided to create a little something for the Very Important Man. I had a stack of kraft envelopes and decided to beautify them using GCD Studio's products. I was in fact torn between doing a card or the altered envelopes. So, I decided to fuse the 2 ideas together.

I altered the envelopes and titled them "She Said" and "He Said".
Well, we have 2 kids so it's going to be a little paper pouch to store little strips of paper/ letters of what the kids have to say about their daddy.


Next, i created a little "jacket" for these 2 envelopes, the size of a card made from cardstock. Secure it together with a stationery ring at the top left corner.

Here is the cover...
Notice the baby blue pattern paper ? Although i did not use any GCD Studio Glitter borders here, i made use of the blue paper packaging. It is just too pretty to discard !


I am so addicted to the metal plates!


Supplies :
Collection Packs - #853 5" x 7" Mat Pad (Artsy Urban)
Collection Packs - #852 8" x 8" Specialty Paper Pad (Artsy Urban)
Embellishments - #848 Mini Tin Signs (Artsy Urban)
Embellishments - #842 Glass Paperclips
Embellishments - #844 Metal Rimmed Glass Brads

hope it inspired you to make something today !
emeline

6.04.2010

Scrap those Summer Chores!

Blue Skies + Sunshine = green grass & weekly mowing...

I was so excited about this months theme. I just love the beautiful blue skies, fluffy clouds,
the colors in the hot air balloon, and the way it makes you think warm weather.

GCD Studios papers mix so well with other lines out there. I did a bit of mixing it up with some Sassafras. I've been so excited to use the fun crocheted flowers from the Artsy Urban line and I finally got the chance.


I hope you're enjoying your summer chores....
Photobucket
gcd products: Ava Collection: Topez & Bloom, Artsy Urban Collection: Big Butterfly, Book Page, Crocheted flowers, & Vintage Brads

6.03.2010

Blue skies, puffy clouds & fresh summer air

Hi there, it's me Heidi V!

I absolutely LOVE GCD Studios June theme! Blue skies, puffy clouds, fresh summer air...I love it! If you know me you know this is right up my alley!

This first card was mostly inspired by that fun gradient piece in the upper left. Of course, I had to add some clouds too!

Every single piece of paper you see is from GCD Studios, including the clouds which are actually a pale, pale shade of ice blue. To find all the different shades of blue I mixed papers from the Artsy Urban, Lydia and Smoothie Shoppe Collections.

Supplies:
DP: (Quilted Foil [back], Sky Brocade [front & back]) Lydia Collection by Melody Ross, (Ice Cubes [front &back], Shoppe Flowers [back]) Smoothie Shoppe Collection, (paper from Artsy Urban 8x8 pad) All GCD Studios, Embossing folder: Provocraft, Letter Stickers: American Crafts, Letter rub-ons: Doodlebug Designs

Size: 5x7"


I freehand cut the clouds and added a bit of texture by embossing them. I thought the sentiment would make it a perfect card for graduation.
I loved the pic of the balloons too, they just feel like summer! Instead of balloons though I decided to take the idea of something colorful and summery and create some pinwheels.

.I broke out Some absolutely beautiful papers from the Melody Ross Lydia Collection for this one, the colors just scream summer! I also altered some brads from the Homespun Chic Collection to create the center of the pinwheels. I removed the small bit of fabric from their center, punched a flower from some Lydia paper and adhered it to the brads to make them coordinate perfectly with the papers I was using.


.Supplies:
DP: (Petit Floral Glitter, Linnen, Sky Brocade, Quilted Foil) Melody Ross Lydia Collection, Brads: (Homespun Brads) Melody Ross Homespun Chic Collection GCD Studios, Letter Stickers: K&Co., Ribbon: Offray, Decorative edge scissors: Fiskars, Other: kabob sticks
Size:5x7"


I love the way that faded blue damask looks like sky and the green plaid looks like grass!

What about summer inspires you to create?

6.02.2010

Ready-made borders in the Artsy Urban Collection

I've got a simple, quick tutorial to share with you today but it's one that can make a big impact on a layout. I love the ready-made borders in the Artsy Urban collection and used a couple on my layout but also created a border of my own using punches.

My layout is fairly simple but it's about a very important routine in our house - when daddy comes home from work! The girls are usually eating supper but they flip out when their dad comes through the door, and I was able to capture it all on camera.


I used patterned paper from both the Artsy Urban and Lydia collections and the border strips, epoxy sticker, paper clip, brads, journaling block, crocheted flower and chipboard title are all from Artsy Urban.

Here's a close-up of my title. I used one of the starburst punches above the chipboard title with a brad.

Here's a close-up of my journaling.


And finally, that brings us to my punched border strip.

First, I selected two patterned papers that I wanted to use. The maroon pattern is from Artsy Urban and the gray pattern is from Lydia.

Next, I selected a punch...this starburst by Martha Stewart. I punched several starbursts from the patterned paper.


I left my starbursts in tact but one way to make a punched shape go further when creating a border like this one would be to cut them in half.


I inked my shapes first and then adhered the starbursts underneath my photo. I partially covered them with one of the ready-made glitter border strips.


Using punches is a great way to get more out of your patterned papers!

Happy punching!

Jill

6.01.2010

June Guest Design Artist

First of all, I want to thank Jen J for being our May Guest gal. She did such a beautiful job with our products and I personally LOVE her style!
Thanks Jen!

To welcome this month's Guest Gal here is her Bio:

Jacquie started scrapping nearly 13 years ago when she got invited to a scrapping home party, and she has been hooked ever since. She has taught classes at several LSS, as well as been published by several Scrapbook publications. She has been on several design teams, as well as having her work featured as a guest designer for several manufacturers. Jacquie and her husband Troy have been married 24 years, and they live in the Austin, Texas area.

So without further ado...
Please welcome Jacquie Dean

The thing I love most about Jacquie's style is her attention to details. I love her rich layers and the fun vibrant colors she uses. It's all just so pretty!

So, to welcome her, Jacquie made this beautiful layout for us.


We hope you enjoy it :)
~H

PS
DON'T FORGET TO SIGN UP FOR OUR NEWS LETTER. We have a new yummy issue going out this week. Lots of fun ideas...lots of pretty things.

5.31.2010

Goodbye May

May has come and now it's gone. Didn't it go so fast?
It brought spring and sunshine.

Did you grow a little this month?
What did you learn this month?
Was this a great month... or a bad month for you?

Share your thoughts about "May" and "what you learned". A friends knowledge is the best kind :)


Today, I have this amazingly beautiful layout, by a dear friend Christine Middlecamp. She amazes me with each new project she makes and we were lucky to have her play with our Lydia collection.

Enjoy


Photobucket

Photobucket

Photobucket

5.30.2010

Nested Dolls Inspire Nested Cards

This was a fun month of Nesting dolls and seeing how our DT gals used the inspiration.

Remember... to sign up for our news letter for the Month of June. There are more amazing ideas in the letter, that are not seen on the blog. Simple email me at
inthestudio@gcdstudios.com
~H

---------------------------------------------------------------------------------------------

Hi all!

Well, I'm at the end of the train this month for GCD Studios.

Heidi's been challenging the design team all month on the GCD Studios blog to make something inspired by these fun dolls.


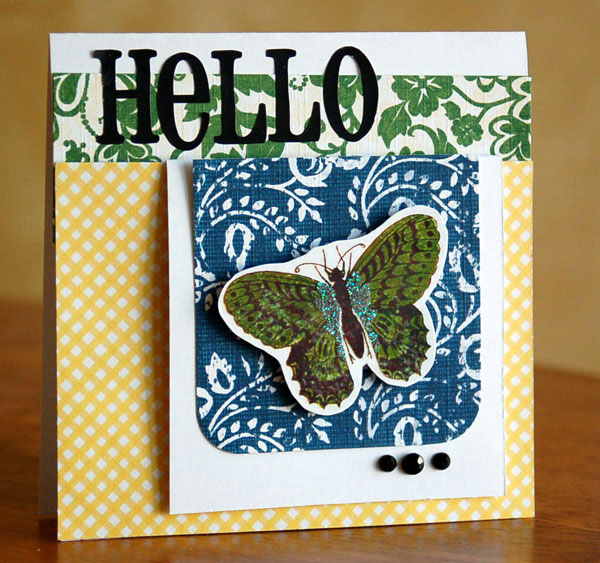
My first thought was to make a cute nesting doll card. That seemed a little too obvious so I decided instead to make a nested cards. I'd somehow incorporate a smaller, blank card onto a larger card. That way, the recipient will receive a card from me, as well as a blank card that she can give to someone else.

I ended up making two nested cards.

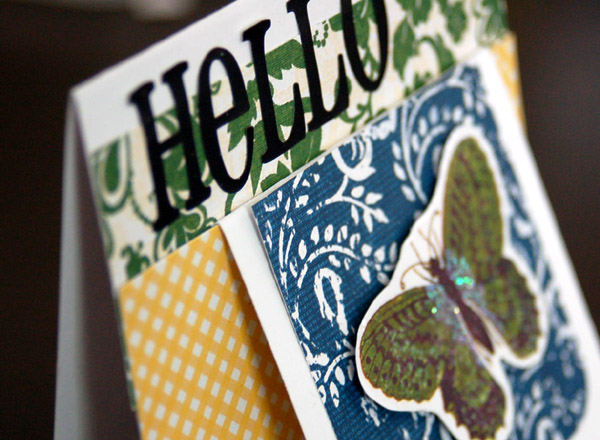
Here's my first attempt.


The small panel with the butterfly is the mini card. The yellow patterned paper from Melody Ross' Artsy Urban collection acts like a pocket. I only adhered adhesive on three sides of it so the little card could be slid out.


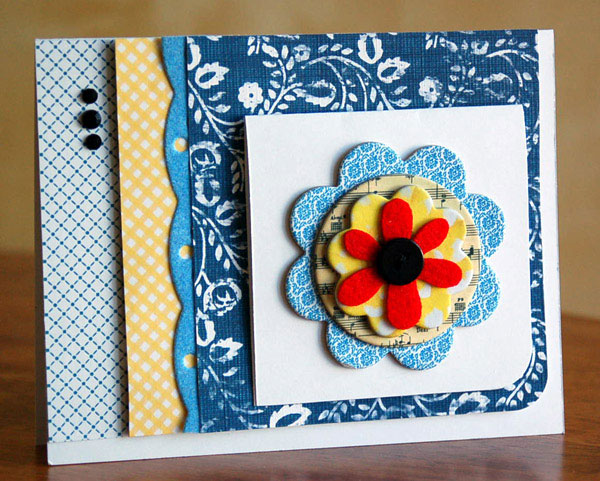
And here's my second attempt.


The flower panel here is the second card.

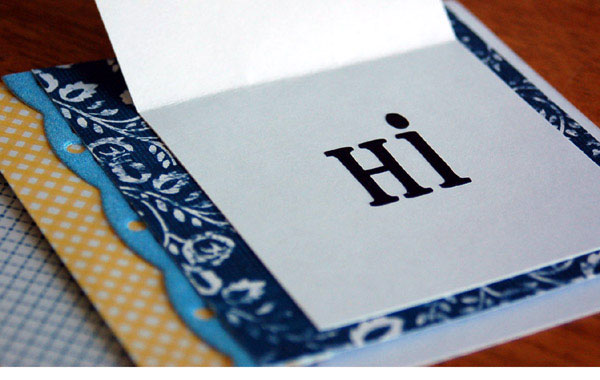
Rather than putting a sentiment inside the big card, I put a sentiment inside the mini card. It serves a dual purpose, working as a sentiment for the recipient of the little card as well as the big card.


With this one, I adhered the mini card with small piece of two-way tape. The recipient just has to pull the mini card off of the big card.

That's all for now.

Thanks for stopping by. I'll be back again soon.

-Teri Anderson
for GCD Studios