9.13.2012

A Month of ABC's - Ii

Hello everyone, Nina here with a cool inky technique today for the letter Ii - Ink stamping on acetate.


I made the cardbase from some clear acetate sheet and stamped the lower half with opaque white ink.


Then I added adhesive to where the front panel will adhere to on both sides of the acetate:


I cut the patterned paper about 1" shorter than the cardbase to let the cardbase show.


Thank you for stopping by. Happy Crafting!
Supplies: GCD Studios Country Charm Collection: Super Star (1511)

                  Nina Yang GCD Studios DT, 2012 GCD Studios Card Gal

9.12.2012

A Month Of ABC's - Hh

Hello all! Clare here today to show yo are a cool, fun, and inexpensive way to add hidden messages to your cards or layouts!

First off, the card...


And the videotaped technique..


If you're wondering where the hidden message is in this card, it's right behind the teacher sentiment! Just peel away the strip to reveal the hidden message - since I don't want to ruin the fun for the recipient, I didn't peel it away to show you here, but I did take a picture before I adhered the two pieces of paper together...


That's it! I hope you enjoyed my little tutorial, and that you'll give it a try!
Thanks for stopping in!


Blog: http://bearydocardsinc.blogspot.com/
Card supplies:
Country Bloom, Cherry Pie, and Sweet Floral

9.11.2012

A Month of ABC's - Gg

Hello everyone, Nina here with some fun ways to add glitter to your cards.


Supplies: GCD Studios - Country Charm Collection: Weekend Fun Paper (1515), Picnic Blanket Paper (1509), Strawberry Jam paper (1510)


I added glitter to some stripes on the patterned paper and some glitter dots with glue dots. I used an anti-static pad, a paint brush and a lint remover to get the glitters under control. Easy as 1, 2, 3:

If you do not want to mess with the glitters, there are also glitter glues!


Supplies: GCD Studios - Country Charm Collection: Vintage Wallpaper (1514), Tiny Floral Border (1513), Super Star (1511), Country Bloom (1505), Floral Field (1507)


Glitter glues are great for touching up on flowers you cut out from patterned paper. I also used it to draw a border around my sentiment.


I squeezed a dot of glitter glue in the center of the flower and used my fingers to flat it out a little.

Thank you for stopping by. Happy Crafting!
                               
                                Nina Yang GCD Studios DT, 2012 GCD Studios Card Gal

9.10.2012

A Month of ABC's - Ff

Ah yes...it is that time of year, kids in school, fall projects and the changing of the leaves.  I do like this time of the year.  I feel like life slows down a bit and that is good when you have had a busy summer like I have.  

Guiseppa here today to share with you a layout of my gorgeous daughter.  This picture was taken last fall, right before she went back to school.  I couldn't wait to scrap it, but wanted to make it just perfect for such a beautiful girl.  So, flowers are in order, but not just any flowers.  I made some flowers out of borders and I want to show you how.  First off here is the layout!


Here is how to make these tiny, cute flowers.

First I chose a border.  This is a border punch from Martha Stewart, but you can use any border punch you want.  You can even cut one out from your die cutting machine.


Here are a couple, but make as many different kinds as you would like...get creative!


Next, you want to roll them up, making sure that pattern you want to see is inside or facing you as you roll.  I used a petal roller to roll mine up, but you can use tweezers or just your fingers.


Now, make sure you glue the end to the rest of the flower, then pull the petals down starting from the outside. There you have it...so fast and easy to do!


Guiseppa Gubler GCD Studios DT, 2012 GCD Studios Layout Gal

9.09.2012

A Month of ABC's - Ee

The letter E is for eyelets. And, if you ask me, eyelets are just plain fun! When I first really fell hard for scrapbooking, eyelets were "the embellishment." I remember many of my friends (myself included) falling hard for them. We amassed them by the dozens (well, 100s)! If you are like me, you still might have some eyelets in your stash. A fun way to use these little embellishments up is to make circles with them. All you need to do is: punch a couple circles from patterned paper and cardstock. Punch an eyelet or two through them and then add a little string to them. I made several circles with eyelets and used them on this simple 4U card.


 I brought red string though two of the circles and wrapped it around the outside of the circle. You can't see it, but there's tape holding the string in place on the backside of the circles. For the third circle, I wrapped the string around the circle and then tied a bow.


 I also used eyelets to make circles for my XO card.


I got a little more adventurous here, adding two eyelets to a couple of the circles.


My favorite is the second circle where I brought string through the two eyelets and then tied a bow between them. It's such a simple, but cute and happy way to finish a card. Supplies: Country Bloom paper - Country Charm; Strawberry Jam paper - Country Charm; Farm Field paper - Country Charm; Sweet Floral paper - Country Charm; Picnic Basket paper - Country Charm; Weekend Fun paper - Country Charm; Tiny Floral Border paper - Country Charm See you again soon!

  Teri Anderson 2012 GCD Studios DT, Teri Anderson 2012 GCD Studios Card Gal

9.08.2012

A Month of ABC's- Dd

Were focusing on the ABC's of Crafting all month long here on the GCD Studios blog. Today is the letter "D" and I have a layout to share with a few "dots".  Paint dots, polka dots, punched dots and even some sewn dots!

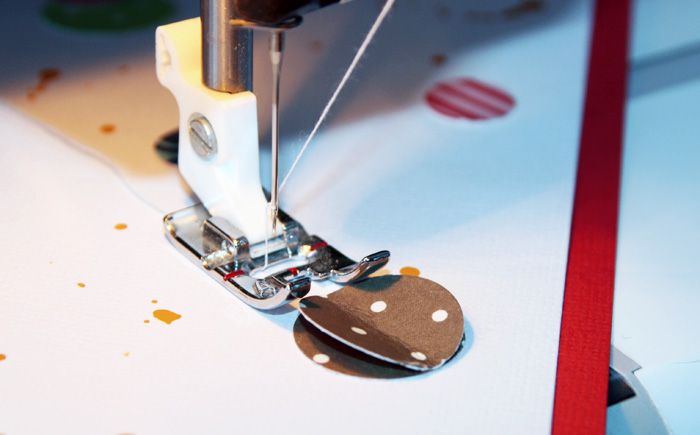
To start, I did a little paint spattering on my cardstock. After it had dried, I cut out the title using my Cricut, and backed it with a coordinating paper. I then added punched dots of various sizes. I used my sewing machine on a few of the punched dots for  just a bit of added dimension.
A quick and easy layout to add to the school days scrapbook!

Thanks for stopping by, and be sure to check out the ABC's of Crafting all month long here on the blog!

9.07.2012

A Month Of ABC's - Cc

Hello my talented and crafty friends.
Are you having fun with our theme this month? Today I have the letter Cc and it wouldn't be the same if we forgot the Chipart Tool.

I have 3 finished projects to share with you using the chipart tool. I personally think it's perfect for altered projects and giving them texture and that "a little something extra!". I really love that it allows you to make name plates for frames 

Photobucket

and a special memory keepsake box.

Photobucket

Or if you love hand crafting your own jewelry, it allows you to design it just the way you want.
Like check out this necklace I made.

Photobucket

To see how to use the tool step by steps, you can see it here
It's pretty darn fun and a ultra CUTE project by Heidi Van Laar.

Thanks for stopping by today and don't forget to come back tomorrow. We will be celebrating Dd next.

Heidi Sonboul GCD Studios Design Team Coordinator, Heidi Sonboul GCD Studios Design Team Coordinator

9.06.2012

A Month of ABC's - Bb

Today's post is brought to you by the letter B! And, by saying B, that means I'm going to show you a fun way to use buttons with your favorite GCD Studios papers: Decorate them! It's really easy to decorate a button. All you need is a few buttons, a couple circle punches, glue and a few pieces of patterned paper.

   
 Start by cutting some small circles with a circle punch from patterned paper. (I'm using papers from GCD Studio's Country Charm collection.)
   

 Add a little bit of glue to your button of choice. Press the paper circle onto the button to make sure it's fully 
secured to the button.


 The end result is something a bit like this.
 

Adhere them to your cards or scrapbook pages with a Glue Dot. I've got a couple cards to share with you today that use my decorated buttons. First up is this sweet little all-occasion card.


I used large buttons here and fairly large circle punches to cut the papers for them.


 And to keep with the button-y feel of the card, I dotted the "i" sticker with a button. I could have decorated it, but I decided to let it be. I also used my decorated buttons on this card.


 It would have been easy to just adhere them and do nothing else. But I decided to step things up a bit and wrap floss about them.


 I love the fun frame feel it gives the card. Supplies: Farm Field Stripe paper - Country Charm; Sweet Floral paper - Country Charm; Handycraft paper - Country Charm; Country Bloom - Country Charm See you again soon!

  Teri Anderson 2012 GCD Studios DT, Teri Anderson 2012 GCD Studios Card Gal

9.05.2012

Hello Sept Issue of The PaperCut


Alright,
Here it is. the newest issue of The PaperCut.

Leave a comment here and you could win Country Charm.
You have until now and October 1st to leave a comment.


And the winner of the Flower Child collection is...

beautifully done! Another fabulous magazine! Love all of the projects, once again I am truly inspired! Thank you!
Lisa


A Month of ABC's - Aa

Greetings everyone!  Tegan here!  It's the beginning of September so by now all the kids are back in school...So we thought we would celebrate school all month long with the ABC's of techniques!   For "A" I am featuring argyle! Argyle is super easy to recreate and will make a big statement on any layout.  Take a look~


Here are the steps~

1.  Here I cut a template from some argyle patterned paper I had on hand and cut out a handful of argyle shapes using 2 different GCD Studios papers.
2.  Line up the papers in an arglye pattern as shown and poke holes for the embroidery floss.  The holes should be directly across from each other as shown by the arrows.
3.  Start to embroider the argyle pattern in straight lines using the holes that you poked directly across from each other.
4.  Embroider the opposite holes to form the complete argyle pattern and enjoy!
Thanks and have a great day!
 GCD Studios Supplies:
Country Charm~  Cherry Pie (1504), Picnic Blanket (1509), and Vintage Wallpaper (1514)


Tegan Skwiat GCD Studios DT, 2012 GCD Studios Layout Gal

9.02.2012

Just one more day...

Make sure to come back to morrow
to see the newest issue of
The PaperCut


Photobucket

9.01.2012

Welcoming September With Open Arms

Hello friends and Welcome September!
As the air starts to get a little crisper, we start to reach for all those warm pattern papers when crafting.
Ya know, the apple reds and golden star yellows. 
This month we have so many projects to share with these warm and inviting colors.
The PaperCut is packed with goodies and it comes out this Monday Sept 3rd.

This month we will be celebrating the ABC's of crafting (here on the blog) and our darling Country Charm collection on the front cover of this month's issue. I personally think you're going to love it. The collection can be found at Stop and Scrap and it's on sale right now... so even better. The collection is almost sold out, so don't wait.

Also, have you made any projects using any of our new collections? We would love to see them. We are now taking submissions to The PaperCut. If you do, email the submissions to Hsonboul@gcdstudios.com and title the email "Reader's Gallery submission". I would love to see your work, so please do submit :)

Thanks for hanging out with us in Augs and we can't wait to inspire you in Sept. 
Have a happy scrappy day everyone!

Heidi Sonboul GCD Studios Design Team Coordinator, Heidi Sonboul GCD Studios Design Team Coordinator