5.12.2013

Let It Shine!

Hi there! Today I'm sharing a layout I made for CHA using the new Charleston collection. I used my X-acto knife to create the sunburst pattern on this page and layered patterned paper underneath.

I embellished the edges with a bit of machine stitching.


Thanks for stopping by :)
Jennifer Chapin 2012 GCD Studios DT photo JENNIFER-CHAPIN.png

5.11.2013

HEY YOU... Get Well Soon

div dir="ltr" style="text-align: left;" trbidi="on"> There are many funky and sweet patterns in the Pure Bliss collection, perfect for bright and cheery projects, to soft and simple cards. I decided to go with the soft and soothing combo for this card, using Ikat, Blooming, and, of course, a Happy Hoop.


I can't tell how much I love these adorable hoops!


Don't be afraid to step outside your comfort zone and make something new with Pure Bliss, whether it be clean and simple, shabby and elegant, bright and fiery, or, soft and soothing! :)
Thanks for stopping in with me today!


Blog: http://bearydocardsinc.blogspot.com/

5.10.2013

Dress Up That Plant

Happy Friday to you!  Amanda here today with a friendly reminder that Mother's Day is only two days away.  Everyone loves to get flowers on Mother's Day, even if they claim they don't care to receive any.  Trust me (and my husband) on that one.  


While I am a sucker for a bouquet of fresh cut flowers, I also adore receiving and giving plants as gifts.  Give mom some pretty annuals and she will have blooms all season long.  As a bonus, you may even offer to plant them for her.


I die cut a box to fit the container of pansies I had purchased at the store.  Forgive the lack of blooms because at the time I photographed this project, it was still too cold to plant annuals.  This sad little plant was all I could find.  


I wrapped the box with a pre-cut border strip and added a label with some darling alpha stickers. 


I stuck a decorative paperclip into the soil to make the project a little more happy.  Plus, it is reusable and mom is sure to love that.  

May you have a joyous Mother's Day!

Supplies: From the Pure Bliss collection: Pink Honeycomb 2023; Alpha Stickers 2032; Label Stickers 2033; Paperclips 2035; Die-cut Borders 2036

5.09.2013

Celebrate Mother's Day With A Card.

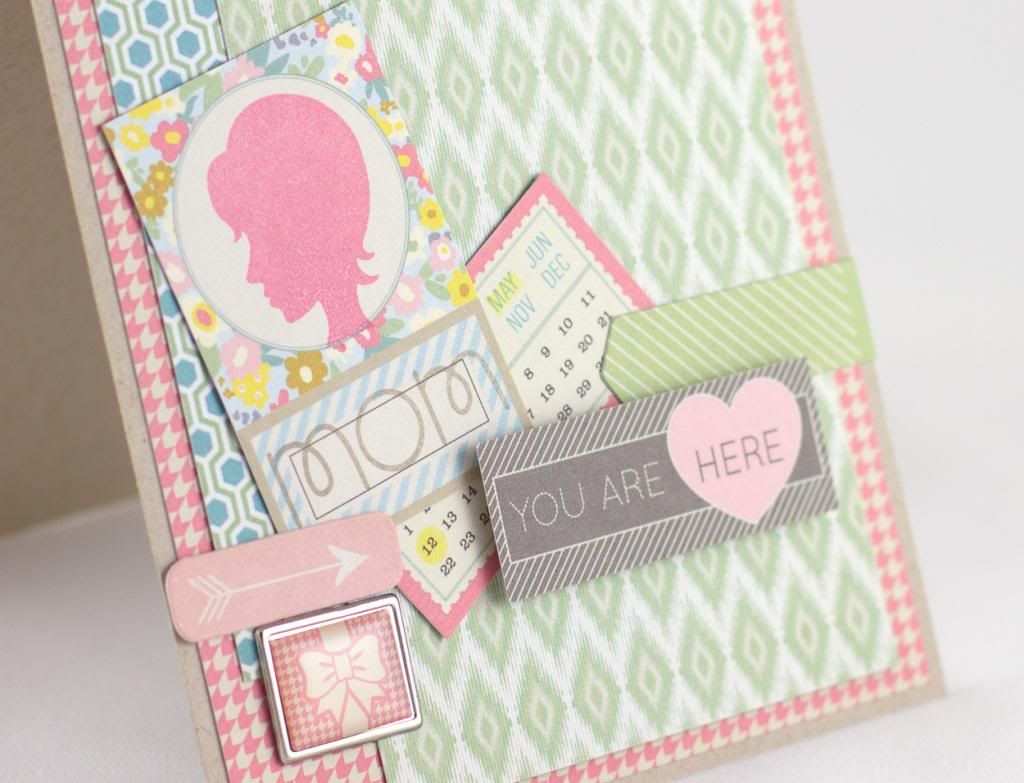
Hello everyone! Nina here today to share a Mother's Day card made with Pure Bliss collection. I love the sweet and sassy paper from this collection! Ikat, strips, hexagon and arrows, anyone? 


Supplies: All paper from Pure Bliss 6x6 pad #2031; pink ribbon brad from Pure Bliss Brads #2034; pink arrow and green strips stickers from Pure Bliss Labels #2033

I love that the accents paper was scaled down for the 6x6 pad as well. I stamped the female silhouette and "mom" directly on the label accent piece. The calendar piece is perfect for any holiday or special days that you are making your card for. I highlighted "May" and "12" for Mother's Day this year.


Thank you for stopping by! Happy Crafting!


5.07.2013

A Bouquet of Pencils

My children and I are super lucky to have great teachers every year.  I really appreciate all the patients and support they have.  So what better way to show gratitude for awesome teachers then to make them a gift.  Lalo here and today I'm sharing a little handmade Teacher Gift using the adorable "Pure Bliss" collection from GCD Studios.
 It's a little paper crafted gift to dress up a teacher's desk.

Here's a lovely post-it holder for all the notes they have to write.


A little something to hold all the pens and pencils they use.

There's so much to love about the "Pure Bliss" collection from GCD Studios.  My favorite is that row of books pattern paper.  How perfect for a teachers gift.

5.06.2013

SIGNATURE SERIES FOR HEIDI SONBOUL'S BOOK, BLOG HOP AND GIVEAWAYS!

 photo HeidiSonboulSignatureSeries.jpg

We are so thrilled that you stopped by our blog for the GCD Studios and Signature Series blog hop.  Heidi has been with GCD for 4 years and to see her now making her own collections (partnered with us) is wondersful. To see this full layout, head over to...
 photo SignatureSeriesBookcover1.jpg

Once last thing before you go. Remember you can now pre-order her book here:
 photo buyitnow.jpg
Have A Happy Scrappy Day

A Darling Shaped Card You'll LOVE!

Hi Everyone! As we near the end of the school year, I am reminded that one of my favorite things to do for my kids' teacher is to make a special card and include a gift. The Pure Bliss Collection has an alphabet paper that is just perfect for a teacher card. It was a MUST USE to create my card today.
I started by die cutting 2 stars using my Silhouette. The size of the stars are 5inches in diameter. You could also use Spellbinder dies or free hand cut the star shape.
Create a card by scoring the bottom star at the top and adhering to the back of the top star.
Then I punched 3/4 inch strips of paper with my scalloped edge punch and adhered them on the card, cutting away the excess.
I made my own garland from heart punches sewn together. The paper pack also comes with a sheet that looks like small journaling tags. I used one to stamp my sentiment. I embellished my card further with stickers and pink enamel dots. You could even hole punch the top of the card to transform it into a tag! Supplies: Paper-Pure Bliss-Alphabet #2019, Pink Honeycomb #2023, Journal Tags #2025, Label Stickers #2033 Stamp-Papertrey Ink Punches-scalloped edge punch and 3 heart punch from Stampin' Up! other: Silhouette, enamel dots Ambrosia Thanks SO much for stopping by!
Wida Miller Badge photo 2013-DT-Badge-Wida-Miller_zps32a1aa68.jpg

5.05.2013

Perfect For A Boys Bathroom

Hi again!  Amanda here with a cheeky piece of bathroom decor that would be perfect for a young child's bathroom.  I am a little over the whole live, laugh, love thing and thought it would be fun to create a fun piece of decor using a play on words.  Behold...

I seriously wish I had thought of this idea 5 years ago.  And believe me, the boyish colors are no coincidence.   The prints from GCD Studios new Indian Summer collection are just perfect for boyish decor.  I fully plan on hanging this over the toilet in my kids' bathroom. 


I arranged and die cut the text using Silhouette Designer Edition software (although you can do this with the regular software, too).  I kept the negative die cut and  matted it with two different types of patterned paper. 


The little toilet seat is my favorite part of the whole piece.  I nested two ovals in Silhouette and cut the top off of the larger oval.  That's it.  Now you know how to create your very own toilet seat die. 


May your kids always remember to flush!

Supplies: Indian Summer collection; ivory 8x10 frame


5.04.2013

Dry Erase Board

Good morning!  It's Tegan here today.  I want to share something from the Charleston collection with you today.  I seriously LOVE this collection~ the color palette is so soft and subtle~ but different in a very good way.  Did I mention before I love making things for parties?  Well I do~ and so I thought it would be fun to make a dry erase board sign using a plain old picture frame.  You could write anything on it- a party menu, a greeting, or whatever you want.

 
I cut a handful of 1" squares and placed them on the outside edges of a piece of Diva paper (2006) that I had cut to size. I then stuck the finished page inside the frame.


Cut a few die-cut flowers and layer them up.  Voila!


Make a simple and cute bow out of paper and you can't go wrong!
Supplies:  Charleston Collection- Diva (2006), Charleston Plaid Dark (2009), Criss Cross (2007), Jazz Age Tan (2004)

Tegan Skwiat GCD Studios DT, 2012 GCD Studios Layout Gal

5.03.2013

P.S. On May 6th We Are Having A Blog Hop

 photo SS-GCD-Blog-Hop-1.jpg

What a Doll!


Hello to all of you wonderful mothers out there! Angi here with a wonderful gift set idea for Mother's Day. I think mothers are heaven sent. My mom is a doll for sure. She has been there for me through thick and thin. That's why I love her so much!


Gift sets are easy to make. I dressed up my card and box with pretty paper from the Pure Bliss collection.


I used my die-cuts to make the box and to add dimensionial elements to the card. The Pure Bliss collection has the cutest paper clips too. I've added some to my project.

Supplies Used: (Pure Bliss Collection) - Pink Honeycomb #2023, Happy Hoops #2018, Cardstock Label Stickers #2033, Paperclips #2035

Have a Happy Crafty Day!

Angi Barrs Badge photo 2013-DT-Badge-Angi-Barrs_zpsf8aeb313.jpg

5.02.2013

Being A Mom

 Sara here today with my very first post as a new GCD Studios DT Member!  Today I am sharing a layout I created about being a mom!

Being a mom is different for everyone one, for me I am a mom to just one little guy!  We decided one child fits our family and we love our little family.   As a mom we go though so many emotions as our kids are constantly growing and becoming more dependent.  My son, Cole is now 9 and he is getting a little to big to do some of the little things that we he and I used to do together like, go to story time at the library and make cute craft projects.  He is growing into a young man now,  to help be sure our relationship continues to grow he and I keep our bond strong with our own special Date Nights!

This layout is created with the Pure Bliss Collection from GCD Studios and showcases a photo from one of our recent date nights.   We went to a local college hockey game, just the 2 of us!  We enjoyed a good game and plenty of snacks! :)

I started this layout with a blank page and then created the big center stripe from 2 sheets of patterned paper and a boarder cut. I then headed to my sewing machine to add some fun zig-zag stitching!   The die cut hearts behind my photo came from a cut on my Shillouhette Cameo - I love how some of the hearts are empty and others complete!

I wanted to add a doily but I wanted to use it in 2 different spots on my layout and I only had one left in my stash!  So, I cut it in half and then could use it in both places!  I topped my project off with a some great stickers and a metal brad from the Pure Bliss collection, a little journaling and a few splats of gold mist!
  Sara Zinger Badge photo 2013-DT-Badge-Sara-Zenger_zps5445a340.jpg

5.01.2013

Happy Spring Time

Nothing says 'spring' more than flowers! Here is a card that I made with fabulous papers from GCD Studios Nostalgia collection. I just love the combination of yellow and blue, it is so fresh and clean! As usual, I chose to keep my card design simple, allowing the gorgeous papers to speak for themselves.

I added a suitable sentiment, and a few silk flowers that complement the papers quite well. For the flower centers, I used some fun glitter epoxy dots.


Who wouldn't love to find this happy card in their mailbox? I know I would!!

GCD Studios Supply List: Nostalgia Collection 6"x6" paper pad: #1998; Embellishments - Happiness Collection Glitter Epoxy Dots: #1868

Other supplies: Silk flowers and trim from Michael's; SRM Stickers sentiment; Fiskars border punch; WRMK corner rounder punch

Instructions:
1. Make card from cardstock. Cover card with blue patterned paper. Round bottom edges.
2. Mat floral paper with yellow paper. Trim bottom of yellow paper with scalloped border punch.
3. Adhere sentiment sticker to strip of paper; adhere to card.
4. Adhere piece of trim underneath sentiment sticker.
5. Adhere flowers to card. Adhere epoxy dots to flower centers.
Finished size: 4 1/2" x 6"

Thanks for stopping by today!!
xoxo
rae

Rae Barthel Badge photo 2013-DT-Badge-Rae-Barthel_zps3a59d361.jpg

4.30.2013

A Really Pretty Spring Layout

Hello Crafters! I am sooo excited to present to you my first project that I created as a Design Team Member for GCD Studios!  I can’t even begin to tell you how much I LOVE this stuff!!  If you haven’t gotten your hands on it yet, you need too! :) 

Fun Spring Memories
For this layout, I wanted to showcase how to use multiple photos on a layout without having to create a double page.  I struggle with double page layouts so this is a perfect solution for me.  
I use a free photo editing program online called Picasa.  Picasa allows you to create collages with a variety of choices.  This program allows me to get 6 photos into a 5x7 allowing me enough space to create a one page layout without over crowding. 

The Nostalgia Cutouts were prefect to add dimension to my layout.  I fussy cut some of the flowers and popped it up and added the adhesive pearls from Kathy Davis’s Ambrosia and Happiness collection. 


It all went together great!

GCD Studios supplies: Nostalgia Flourish in Red (#1993) and Floral Tile papers (#1989), Nostalgia Cutouts (#1992), Donna Salazar’s Fun & Funky Chipboard Alphas (#2106), and Kathy Davis’s Ambrosia Adhesive Pearls (1886 & 1887) & Glitter Epoxy Dots (#1868) Adhesive Pearls. Other:  washi tape, ribbon and pins.