5.19.2012

B's Week - Blankets for inspiration?

           Hey there friends, Emily here! I'm excited to share with you my first project with GCD Studios. This week at the blog were exploring the letter "B" so today I am going to show you how to incorporate blankets into your paper-crafting. By looking at the smooth edges, fun patterns that you find on quilts and the soft texture of blankets, you can easily find fun ways to incorporate blankets into your paper-crafting.      For my first card I was inspired by these two photos. Triangles are a fun trend right now, and I liked how they changed direction row by row in the first blanket. I was inspired by the second blanket's use of different patterned fabrics, but arranged them according to colors.
             Source                      Source
    So, I took the triangles from the first blanket, and the grouping of patterns according to color from the second blanket and combined them into this adorable card. The Splendid collection worked perfectly in terms of color and pattern size, considering the teeny little triangle size
I rounded the corners of the Labels and Tags paper and then used pinking sheers to trim the bottom edge, mimicking the look of fabric swatches, with the soft corners of a blanket. I even added a pleated ribbon to add a bedskirt-type look.
I popped up a few of the triangles with foam tape. A little stitching at the top reminds me of the stitching on a blanket or quilt.
For my next card I was inspired by the pinwheel shape found in this quilt
Making the pinwheel shape found in the quilted blanket is so easy!
1. Punch or trim triangles.
2. Adhere to card as shown in picture, affixing some triangles with foam tape
The embossed dots border reminds me of the dotted texture that you find on baby blankets.
I loved the blues, greens and browns found in the Bonjour collection. The colors are soft and muted, also mimicking the feel of blankets.
Well, that's it for The B Week! I hope you enjoyed all the ideas we showed you!


supplies:
"Thanks for All You Do" Card:
Paper: (Floral Frame-1677, Heirloom-1678, Labels & Tags-1679, Letter Tiles-1680, Posies-1683, Sunswept-1684, Tiny Blossoms-1685,  Woven Chevron-1685, Zig Zag-1685) Splendor collection.
Cardstock: (White) PTI.
Fibers: (Pleated ribbon)May Arts. (Red grossgrain).
Accents: (Blue, yellow, and green pearls) Queen & Co.
Clear Stamps: (Sentiment) PTI.
Dye Ink: (Tuxedo Black) Tsukineko.
Tools: (Pinking Sheers). (Square tool) Epiphany Crafts.
"Pinwheel" Card:
Paper: (Cafe Mosaic-1537, Les Fleurs-1538, Ooh La La-1540, Petit Fleur-1542) Bonjour collection.
Cardstock: (White) PTI.
Fibers: (White and Green string)May Arts. 
Accents: (Green, turquois and cream pearls) Queen & Co.
Tools: (Dots border embossing folder)Provo Crafts. (Square tool) Epiphany Crafts, (Corner rounder) Fiskars.


5.18.2012

B's Week- Stop and Smell the Flowers

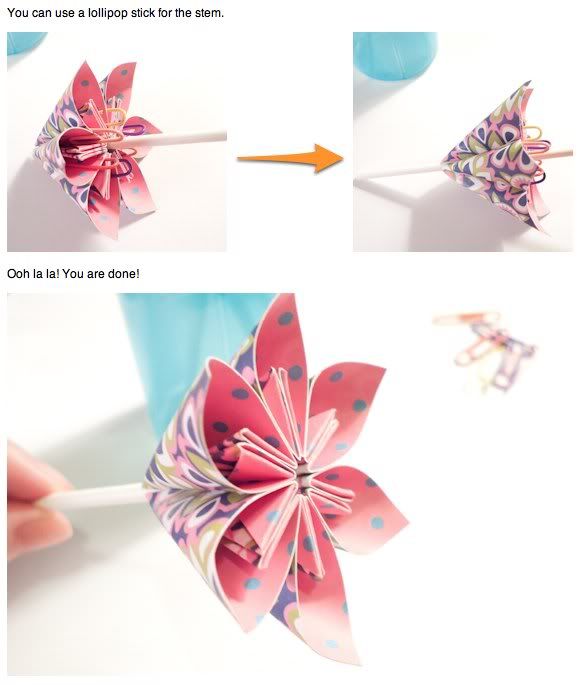
The Flower Child Collection has such bold and happy colors, I wanted to make them into a bouquet of flowers the moment I saw them:)


Supplies: Striking Stripe Paper (1647) - Flower Child, Flowery Paper (1641) - Flower Child, Flower Child Plaid Paper (1639) - Flower Child, Wondering Geo Paper (1638) - Flower Child and Organic Geo Paper (1645) - Flower Child

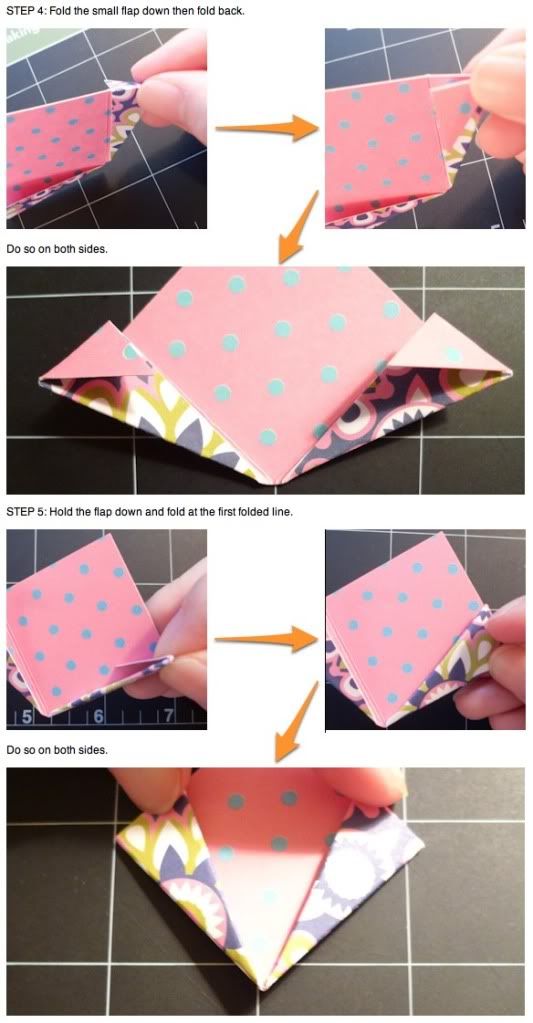
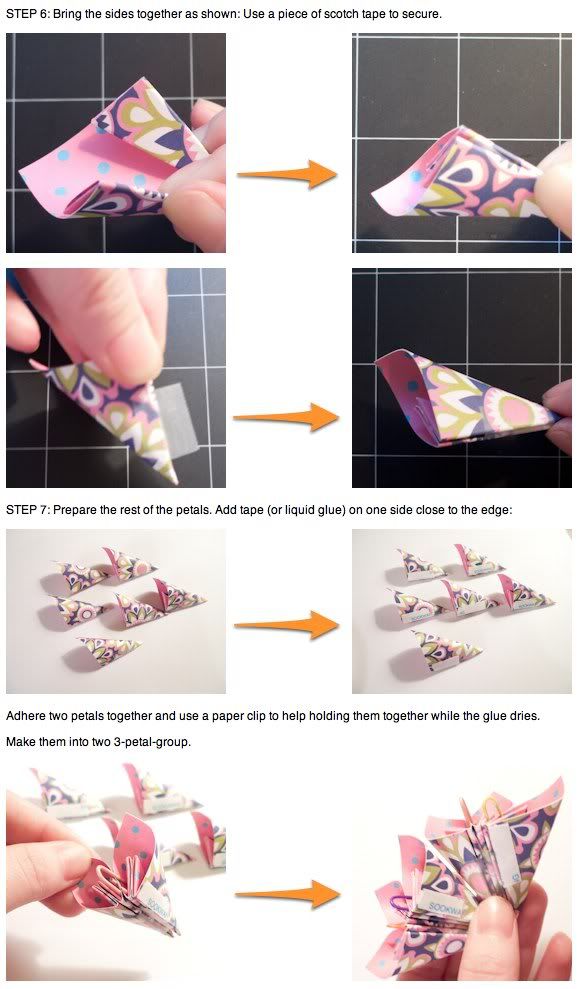
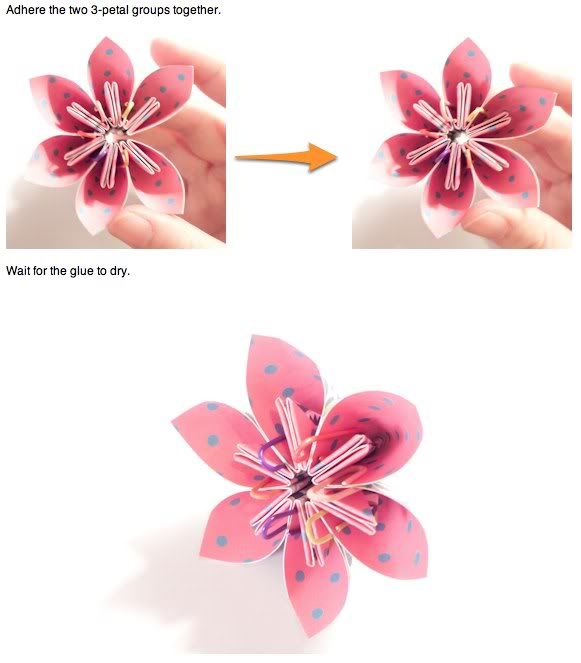
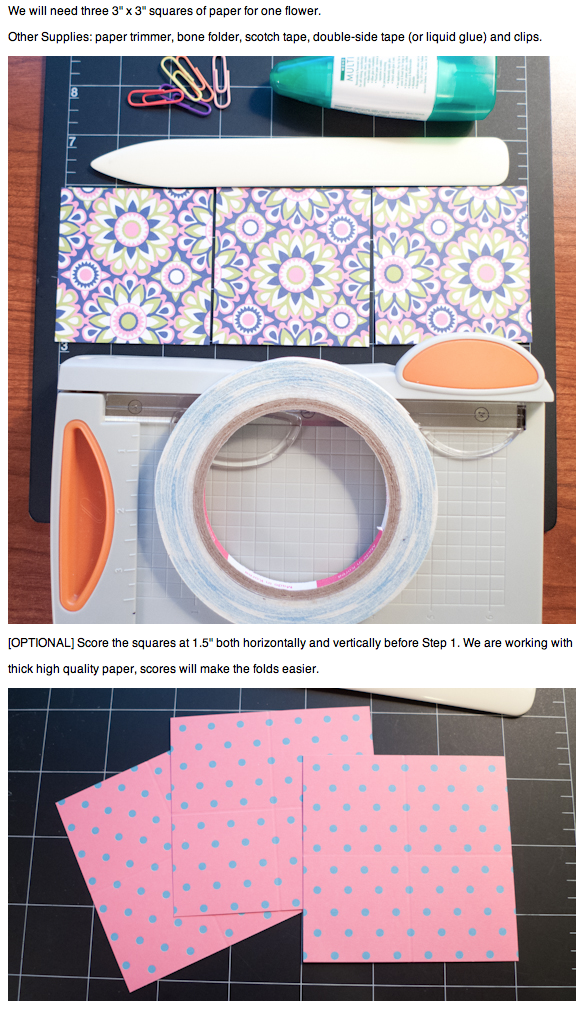
The blossoms are based on the traditional origami flower. The original version was designed for thin and single-sided origami paper. Here is my version for the beautiful heavy weight double-sided patterned paper from GCD Studios:) Save half the amount of paper used and get this beautiful double-sided look! :) Let's get started!


Nina Yang GCD Studios DT, 2012 GCD Studios Card Gal

5.16.2012

B's Week - Buzz Buzz

Amanda here gracing you with my presence today!  At this time of year, the bees are buzzin' here at the Coleman household.  We have a lovely ornamental fruit tree in our front yard that just swarms with bees in the springtime.  I love to watch them buzz around and collect pollen.  (The biology teacher in me wanted to write an entire post on pollen collection.  It is so fascinating!)  My project today was inspired by the bees buzzing in my yard and the tiny bees on the Andrea Paper from the Oh Happy Day collection. 


I die cut an oval, hearts and parentheses and assembled my bee to look like the one on the Andrea paper.   Cute little bugger, huh? 


I die cut approximately 80 flowers from the Mira's Pearls paper, rolled them up, and stuck them in a 3" foam ball with quilters pins. The subtle variation in the pink print adds a bit of extra dimension to each of the rolled roses. 

I covered a small wooden pot with a coordinating print from the Country Charm collection.  I love how the print on the Handycraft paper looks like a basket weave. 

(BONUS: I couldn't resist.  If you are interested in learning more about how bees collect pollen, check out this post on my blog today.  You won't look at bees the same ever again!)

Supplies: Mira's Pearls Paper (1764) - Oh Happy Day, Andrea Paper (1773) - Oh Happy Day, Handycraft Paper (1508) - Country Charm, Flora Craft floral wire and floral foam, Dritz quilting pins, Nicole Crafts wooden pot, Offray pink satin ribbon, reindeer moss (floral supply), 3" foam ball, black, yellow and vellum scraps.


-IMPORTANT NEWS-
One more thing before you go :)
We are so excited to announce that Scrapbook.com is carrying out new collections
Oh Happy Day, Splendor, and Botanique
To see them all 

They are selling fast, so hurry and buys come ;)
~H

5.15.2012

B's week...who doesn't love birds?

Photobucket

Yep...that is how we are when the King sisters get together. We chirp and chatter. It is true what they say...Birds of a feather stick together. So, lets talk about birds. They are social, beautiful and graceful...hmmm this describes the Kings sisters to a T!

Photobucket

To create this layout, I used the Country Charm Collection. I cut the title, clouds, birds, borders and banner out by using my Silhouette and the Picnic Basket, Weekend Fun, Sweet Floral and Country Bloom papers.

Photobucket

Photobucket

I love to fussy cut so I used the Strawberry Jam papers and cut out the cute little blossoms and strawberries and adhered them around my layout using foam adhesive.

Photobucket

I love, love, love birds and they are a huge trend in scrapbooking right now and the Country Charm Collection was perfect for this layout of me and my fine feathered friends.

Supplies: Country Charm Collection, Farm Field Stripe (1506), Weekend Fun (1515), Sweet Floral (1512), Tiny Floral Border (1513), Country Bloom (1505), Picnic Basket (1509), Strawberry Jam (1510), Floral Field (1507). Other Supplies: Silhouette and Foam Adhesive (American Crafts)

  Photobucket

5.14.2012

B's Week- A Basket Full Of Kitten

Hi, it's Amanda!  The title of the blog post was enough to make you check it out, right?  Way back in eighth grade art class, I remember learning how to weave baskets.  I thought I would put my basket weaving skills to the test and see if I could weave a basket out of paper.  Plus, having a friend with a new litter of kittens didn't hurt either.  Basket + Kittens = Pure joy.

And here's what the basket looks like sans fussy kittens.  Fun, huh?  Plus the whole thing is made out of paper!

For the basket, I picked the striped Sunswept print from the Splendor collection, not only because it had vertical stripes, but also because the yellow print would make the inside of the basket look pretty, too.   I created the bow using a the red gingham Picnic Blanket print from the Country Charm collection.  I opted to keep the basket simple and sweet so the contents would be sure to stand out.  To make the bow,  I used Heidi Van Laar's paper bow tutorial.  You can find her bow tutorial HERE

While the basket did take a little time to put together, it was not difficult.  Here is how you can make your own woven paper basket (finished size without handle 6.75"x4.5"x4.5"): 

1. Cut 28 1"x12" strips of paper.  Make 14 long strips of paper by overlapping and adhering two 12" strips together.

2. Weave 10 long strips of paper together creating a 4x6 grid in the center.  Adhere the outermost strips of paper together.  This will become the bottom of your basket.   

3. Flip the paper over and score the strips approx 1/8" from the edge of the weave.  

4. Fold the strips along the score and lightly secure the tops together with washi tape (or other repositionable adhesive).  This helps keep everything in place while you weave the sides of the basket.

5. Score each of the four remaining long strips with spaces 6 3/4" and 4 1/2" apart.  When folded, they should look like this.  (Do not secure the ends together yet.  This is just a demo.)

6. Weave the scored strips through the basket sides.  Adhere the ends of the horizontal strips together after weaving them through. 

7. Give your basket a "haircut".  This is also where you can even everything out and make your basket look pretty.  Once your basket is pretty and evenly spaced, adhere the top of the vertical strips to the uppermost horizontal strip of paper. 
Adhere strips together.

8. Cut four strips of 1/2"x12" paper.  Create two score marks 6.75" apart on each strip of paper.  Adhere strips to the top of both the outside and inside of the basket. 

9. Cut four 3/4"x12" strips of paper.  Adhere two strips together to create one handle.  Round the corners and punch a hole in each end.  Punch two holes in each side of the basket.  Attach handles to the basket with brads.  

10. Wrap a 3/4" strip of patterned paper around the top of the basket and add a bow (bow tutorial HERE).  Now it is ready to fill with kitties! (or other fun gifts). 

Supplies:
Picnic Blanket Paper (1509) - Country Charm, Sunswept Paper (1684) - Splendor, brads (office supply)

Thanks for hanging out with me today!

5.13.2012

HAPPY MOTHERS DAY!

For my first assignment at GCD, I got a wonderful topic.. It's one of my favorite things in the world.. which is my Family. This week the focus has been on mothers, and with Mother's Day actually being today. Today my layout focuses on my Mother. I also wanted to make sure that my journaling focuses on why she means so much to me. I used the Splendor line for my page, which was perfect with all the florals and pretty, soft colors, but still kinda has a vintage type of feeling. I used the "Floral Frame" paper for my main central focus point on the layout.

Photobucket
  
I used one of the labels and tags for my journaling. This is what I felt was most important on my layout, the main focus. I know most of the time it is a photo, but this time it's the journaling. I'm pouring out my feelings of why my mother means so much to me. The journaling reads: "Thanks for teaching me right and wrong, Thanks for teaching me how to be a good mother, Thanks for teaching me to serve others, Thanks for teaching me for standing up in what I believe in, Thanks for being there for me & our family." I also fussy cut out the flowers of the frame and dressed them up with some bling and pearls: For my alphas, I used the "Letter Tiles" paper, and cut out the ones I needed for my title. Then I used some foam pop dots to give them a bit of dimension. I also cut out some of the patterned "flowers" from the "Heirloom" paper and placed them through out the page, added some spiral flowers in the center.So that is my page, my tribute to a wonderful mother. I feel very blessed and lucky to have her in my life. Wishing all of you a magnificent Mother's Day.

5.12.2012

Mother's Day Week - Gift for her

I found it harder and harder each year to come up with a good gift for the most important and most special woman in my life for Mother's Day. So this year, I am giving her a gift card :) I made a card and a gift card holder to add some personal touch. I was inspired by this photo  to use a tote bag for mother's gifts!


Supplies: Posies Paper (1683) - Splendor, Candytuft Paper (1676) - Splendor, Letter Tiles Paper (1680) - Splendor, Zig Zag Paper (1687) - Splendor

Download the Tote Bag Template
Print the template at 100% scale on paper or cardstock to use as a template. 


Decorate!


The tote bag is in a pretty good size when finished: 4"x2.5"x2". I hope that you are inspired to make one yourself using some beautiful GCD Studios papers! Have Fun and show our mothers and gradmas how much we care! Happy mother's Day!

Nina Yang GCD Studios DT, 2012 GCD Studios Card Gal