4.21.2010

"embracing change"

Hello!!
Jamie Harder here today, to share my layout that I created using these gorgeous flower photos as inspiration(seen all month long). The pink flowers immediately made me think of my oldest daughter since she loves all things pink, and she is also blooming into a wonderful young lady - a little faster than I hoped:-)


I used the beautiful papers from the Homespun Chic collection as well as the Smoothie Shoppe collection and they mixed together perfectly! I added a pull out journaling tag on my layout and attached the gorgeous glass brad from the Artsy Urban collection. My favorite item from the Artsy Urban collection is the Inspiration Cards and the butterfly with the words "embracing change" was the perfect addition for my page!

4.20.2010

fabulous papers, embellies, and borders

Here is another project following this months theme:

I have always been a fan of GCD Studios, but when I finally got the Homespun Chic line by Melody Ross...I was blissfully happy! The colors and designs are gorgeous and I just loved playing with all this goodness.

I created this layout with some of the fabulous papers, embellies, and borders from the Homespun Chic line. I love taking spring and summer floral pictures and hydrangeas are some of my favorite. I used this layout to highlight this flower from my brother's yard.
Photobucket
I created my own flower and then surrounded it with pre-made embellishments that I enhanced by adding just a few brads, bling and glass.

This flower started as a plain white flower. I sprayed it with some pink mist, added a pearl to the center and drizzled a little glue on it. I then sprinkled it with crushed glass. I love the elegance it adds to the layout. It also draws out the colors in the pattern paper.

Thanks so much for dropping by!
Mimi L

4.19.2010

“Spring has Blossomed”

APRIL THEME LAYOUT
By: Melissa Mann

The theme for my “Spring has Blossomed” layout was one that involved a clean, simple, fresh, & springlike look. To achieve this, I used light colors that invoke the thoughts of new fresh spring growth.

Yellow & green are the predominant colors used on this layout. The pictures are of some dogwoods in my neighborhood that had just recently burst into bloom! I used the patterned papers from the Ava Collection & the English Garden Collection. I also used the new Chip Art Tool on this layout! If you look at the top left hand corner, you will notice a scalloped piece of chipboard with the word “spring” imprinted on it. I used the lowercase alphabet to spell out the word. After placing each letter on the chipboard, I then painted the entire thing green. After that dried, I mixed together an off-white color paint and some mod podge – then painted that over top the green. I let it dry for just a moment, and then wiped it off and then inked the edges.

The following links will show you some pictures that inspired the color palette for this layout.


SUPPLIES USED:
Cardstock: Kraft
Patterned Paper: GCD Studios Ava Collection & English Garden Collection
1.Sunny Pinwheels
2.Crosshatch
3.In the Conservatory
Thread
Punches: Martha Stewart Border & Butterfly Punch, Fiskars Scallop Punch, & EK Success Circle Punch
Chipboard: GCD Studios
GCD Studios Chip Art Tools
1.Lowercase Letters
2.Mallet
3.Mat
Embellishments
1.Fontwerks Label Sticker
2.My Minds Eye Lush Alphabet
3.Pink Paislee Captivating Alphabet
4.My Minds Eye Lush Bling
5.GCD Studios Crocheted Flower – Artsy Urban Collection
6.GCD Studios Flower Button – Homespun Chic Collection
7.GCD Studios Glitter Butterfly – Artsy Urban Collection
8.Rubons – unknown
Ink: Black Stazon
Stamp: Studio Calico
-----------------------------------------------------------------------------------------------

Also, here are 2 BEAUTIFUL layouts by Laura!

This banner is to die for and I love the pop of aqua teal with pink

And check out this layout. Laura and I became friends at the 2009 CHA winter show. Thanks to scrapbooking we met! This layout also has another great friend of mine on it... Emilie Ahern :)
Thanks Laura and Melissa for your beautiful work! Love ya girls!
~H

4.18.2010

paper-rimmed buttons

Hi all!

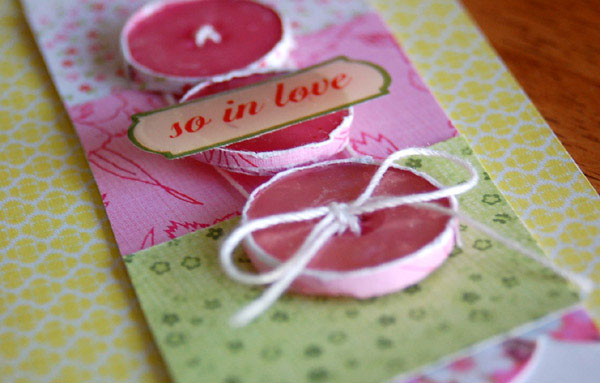
Teri here today, and I'm excited to share a new and fun way to alter buttons.

I am going to show you how to make paper-rimmed buttons with patterned paper from the Melody Ross' Homespun Chic collection for GCD Studios.

Paper-rimmed buttons? You are thinking, "What?" Yeah. I know. ;)

So here is a peek of what I am talking about.


Cute, huh?

Paper-rimmed buttons are so easy to make. Let me show you how.

You are going to need: buttons; patterned paper; a bottle of glue; scissors; nail file or sand paper; and a paper trimmer.

And here's how to make a paper-rimmed button.

1. Use your trimmer to cut a strip of patterned paper. The paper should be wide enough to fit on the edge of your button.


2. Squirt a dab of glue on a piece of scratch paper. Roll the button through it. Don't worry if excess glue gets on your button. Just clean wipe it off with a rag or paper towel before it dries.


3. Roll the paper strip around the button. Trim away the excess paper.


4. Use a nail file or sanding blog to sand the edges of the paper.


5. The end result? A really cute button (or two or three).


And here's a card I made with my buttons.


I think the paper gives the buttons a little extra personality.


And here's another card I made with my buttons.


Stinkin' cute!

Thanks for stopping by!

I'll be back again soon!

Teri Anderson
for GCD Studios

4.17.2010

A tiny flower to create a border


I enjoy documenting my twin daughters' growth by creating layouts for each month of their first year. I thought the Lydia collection matched perfectly for their 7 month photos. I love the flocked yellow patterned paper in the collection - the texture creates such an elegant look.


To create my title block, I used one of the plaques from the ChipArt chipboard collection and a tiny flower to create a border along the bottom. I then dry brushed brown paint across the plaque. I machine-stitched along the edge of my chipboard piece. Yes, you can even stitch on chipboard (I would suggest using a separate needle just for this purpose). I cut a strip of the green and cream plaid patterned paper and pleated it before I placed it above my flower border. I cut out a purple flower and green leaves from the patterned paper and adhered it with foam adhesive. Finally, I adhered my title and a rhinestone to the flower.


I kept the rest of my design fairly simple but wanted to create some interest and texture above the larger photo of my daughters. I made a row of patterned paper flowers and will share this easy tutorial with you.


To begin, freehand cut a circle from patterned paper.


Then cut a spiral in the circle (the key here is imperfection…don't worry about keeping lines straight).


(Before beginning the next step, you can distress the edges of your spiral with ink or paint). Start at the center of your spiral and begin swirling your circle into a rolled flower, adhering with glue dots along the way. Add a button, rhinestone, or die-cut to the center of your flower.


It's easy to create these flowers and they add a lot with minimal supplies and time. Try varying the sizes of these circles as well for added interest.


(Additional supplies used: American Crafts thickers, Basic Grey alphabet stickers, Melissa Frances rhinestones, Fiskar's punch).

Happy Spring!
Jill

4.16.2010

get out your old paper crimper!

Happy Spring! Our theme this month at GCD Studios is all about spring! And with that being said, I was inspired to create this bird house using the Homespun Chic collection! The gorgeous pinks and greens just scream "Happy Spring!" to me!

Be Brave Birdie
by Juliana Michaels

Here is a close up my sparkly little birdie!
I used the Chip Art tool to add the fun texture to the Chip Art bird!
She really has a fabulous sparkly quality!

Chipboard Birdie Technique:
Paint the chipboard bird with yellow acrylic paint.
Let it dry.
Using the mini ornamental stamp, stamp the image randomly all over the bird.
Paint it with Shimmerz.
Let it dry.
Cover with a light coat of Stickles.
Let it dry...
And ta-da! You now have a super sparkly, happy yellow birdie!


Here you can see some of the dimension I created by cutting out extras of the flowers and popping them up with double sided foam tape.
I finished them off by adding a little pink pearls to the centers!

For the roof, I ran strips of paper through a paper crimper.
I then cut these strips into random sized "tiles" and hot glued them to the roof to give it the appearance of a real roof.
Supplies:
Homespun Chic Pink Sparkle
Homespun Chic Homespun Mod
Homespun Chic Pink Stitchery
Homespun Chic Word Strips
Chip Art Chipboard Shapes Birds
Chip Art Ornamental Stamps Mini Shapes

Other Supplies:
Bird House Hobby Lobby
Shimmerz
Stickles
Kaiser Craft Pearls
Fiskars Paper Crimper and Border Punch


I hope this project helps you become a bit more spring inspired today!

Happy Hugs!
Juliana

4.15.2010

I just had to stamp the sentiment!

I'm so happy to be hosting this little tutorial for you today. These "flowers" are so fun and easy to make with just a few punches or nestabilities. The amount of layers you wish to use is totally up to you. The one below has 7 layers (if you count the felt layer I snuck in on the bottom).

If you haven't noticed by now. I love Homespun Chic. It has "me" written all over it! Melody Ross has out done herself once again on this collection. The variety and versatility of this collection is phenomenal! I constantly find myself pulling it out over and over again. Not only is the paper darling and fun. The embellishments that coordinate with this collection are amazing. If "girly" is your thing... you will definitely want to get your hands on some Homespun Chic. Just sayin'. :D
(see the fun chipboard piece) It comes like that
I just had to stamp the sentiment.

I taped a little bag of
jellybeans to the inside of the card.

First start out with a variety of different
sized punches. You could also use nesties.

Punch out five circles and
hand cut the top circle
(I didn't have a coordinating punch).

Score each circle.

They will look like this.

Fold along each score line.

Then bunch together at the bottom.

Hot glue to form the correct shape.
Hold in place until cooled.

Repeat each layer until
desired affect is reached.

I simply couldn't resist using Ella Blue!
It is another collection that I feel is a must have.
To create the Mother's Day card. I cut the flower and leaves out of one of the 12x12 sheets out of the Ella Blue collection. I adhered it directly to the card base and added the handmade flower, some pearls and a stamped sentiment. Easy peasy!! This card can be completed in approx. 15 minutes. What's not to love about that?! :)
Have a super day!
~lori

4.14.2010

"handmade" + a GIVE AWAY!


sign up for our news letter and google follower to win our Ava collection give away.
For the news letter... simple email me at inthestudio@gcdstudios.com
and you'll receive our new newsletter.

-------------------------------->
For our Google follower... simple click on the button to the right (in the Google follower window)
--------------------------->

Once you've done both, Leave a comment
you have until April 16th to enter (this Coming Friday).

--------------------------------------------------------------------------------------

It is my turn to inspire you with my interpretation of the theme for this month. The image that we were given to work with was this one ...

theme image

I loved the colour combination - so pretty and floral and I decided to go with that colour scheme for my layout. I have used all papers and embellishments from the Homespun Chic range by Melody Ross.

It was ideal that this range has a real "handmade" theme to it and I decided to strongly incorporate that into my layout by doing a layout on a little handmade store in my neighbourhood that a friend and I attended the opening of.

wren 1

I have used a white cardstock background - splashing it with a little pink glimmermist and then bordered the whole layout with thin strips of green patterned paper.

wren 2

I have then used a sheet from the Homespun Chic Mat Pad in the top right hand corner - perfect size and colours for this layout.

wren 3

I have used a grid pattern for the photos (which was also inspired by the theme image with its grid design) and have then layered various embellishments around the photo cluster. I have handcut the flowers in the bottom left corner from a sheet of paper from the 8" x 8" collection pack.

wren 4

I have used a range of embellishments including buttons, glass brads, chipboard word strips and labels, made for you tags and transparent shapes.

I have finished the layout with a flower handmade by a friend, which I thought was just the perfect touch for a layout celebrating my love of handmade products and letter stickers that have a touch of glitter to them.

wren 5

This was just such an inspiring theme! I hope you give it a go yourself ...

Cheers
Kim :o)

4.13.2010

Paper Scraps


Hello!! Jamie Harder with you today and I am so very excited to share with you my first layout, as a GCD Studios design team member!!
With Spring in the air, I have been on a huge kick of adding butterflies and flowers to my projects. I absolutely LOVE this flocked butterfly that I cut out from the Artsy Urban collection - it is so soft and it mixed beautifully with the papers from the Homespun Chic collection. I continued the butterfly theme at the top of my page, where I misted over an old die cut I had. For added texture, I used the Chip Art tools to make a pattern on the "M" (my daughter's initial). And finally, I made my own cute flower out of paper scraps and today, I am going to show you how to make one!
It is super easy! Here are the steps:
1. Cut 5 paper strips to 3.5 inches long.
2. Fold to desired thickness.
3. Make a loop by glueing ends together.
4. Continue glueing loops together until you have formed your flower.
5. Embellish your flower with a button or as desired!
So don't let any of your beautiful GCD Studios paper go to waste and make a cute flower out of your scraps!!

----------------------------------------------------------------------------------------

Also here are two more GORGEOUS projects from our Guest Designer Laura!

I love the way she used our layover embellishments on this mini

AND the uses of this boarder strip!
Thanks Laura and Jamie for today's post
~H