6.17.2010

From a soda can...to a robot!


I'm excited to bring you my technique today. I guess you could say I was inspired by the bright and shiny necklace in the photo. And of course, I can't leave out the vibrant blue skies.
A light bulb came on when I was digging out possibilities for this month's challenge. I believe I was working on another project and had these two pieces of chipboard laying out on the table. For some reason they caught my eye and all I could see using them for was a robot. I could just envision his cute little boxy face. Almost immediately I went to work spray painting the little dude.
After mulling the idea around for a bit. I started thinking of supplies I already had on hand that I could use. Like pop cans. I washed a couple out before bed that night so they could be drying. Then the idea to use hardware came into play. So I dug around and found some in a kitchen drawer. All I had to do was dab some acrylic paint on them with tiny piece of a sponge.
Without further ado....Meet Ramsey the robot. I think he's such a cutie! He was so much fun to create. Hmmmm, maybe he needs a Mrs.?


Supplies: 2 pieces of medium plaques chip art chipboard (#551), blue redwork homespun chic paper, red and white card stock, 2 pop cans, silver metallic spray paint, 7 silver nuts (hardware), silver wire, 1/2 in. circle punch, rhinestone, stickers, blue acrylic paint, pen, hot glue gun, kid paintbrush, foam tape


Spray paint chipboard. Allow to dry (approx.15 min)

Cut two 1 in. strips from one can for legs. Accordion fold and adhere.
Cut two 3/4 in. strips from 2nd can for arms. Accordion fold and adhere.
Create two rectangles from a piece of scrap aluminum.
One will be cut for the eyes. The other will remain uncut for the neck.
Cut one rectangle in half. Fold to create eyes. Make a small square
out of scrap aluminum. Fold to create a triangle for nose.
Also cut small rectangle for mouth.

Wrap wire around end of paint brush to create antennae.

Complete instructions:

  1. spray paint chipboard. allow to dry approx. 15 min. cut pop cans to create arms and legs
  2. accordion fold arms and legs. adhere.
  3. cut neck from scrap. adhere to head and body to connect. create eyes, nose and mouth. adhere.
  4. paint nuts. allow to dry approx. 15 min. once dry adhere.
  5. trace and cut middle panel. hand draw hearts, hands and feet. cut and adhere.
  6. affix stickers to card stock. cut and adhere.
  7. wrap wire around paintbrush. remove. punch out circle affix rhinestone. adhere to wire. adhere wire to robot.
  8. cut card stock to create card base. cut patterned paper slightly smaller than card stock and adhere. Adhere robot to card base using foam tape.

~lori

6.16.2010

Go Fly a Kite!!!

We had a fabulous inspiration piece for this month! Don't you agree? I was most definitely inspired by the blue skies and the fluffy white clouds!

Here is my take...

...on this photo collage!

I just love the dimensional feel to the kites and the clouds!
I started by sketching out my design and then drawing out the clouds on the patterned paper. I cut the kites out of the patterned paper and folded them to create the creases. I then popped them up using double sided foam adhesive.
But what about those fluffy clouds you ask?!

To create the fluffy clouds I cut out 2 of the same shape for each cloud. I used my sewing machine to straight stitch around the edges leaving a small opening on one end. I then stuffed pillow stuffing inside the paper cloud pillow and then sewed that end closed. I adhere them with a small amount of hot glue from my hot glue gun! Supplies:
Patterned Paper: Lydia Collection Petit Floral Glitter, Lydia Collection Sky Brocade, Smoothie Shoppe Collection Ice Cubes


Happy Hugs!
Juliana

6.15.2010

WINNERS + White tissue paper and mod podge

The winner of the butterfly stickers is....

Janine Rachau said...

Lovely cards! And, awesome dimensional stickers! Fingers crossed. :)


The Winner on FB for the boarder strips is....

Kelly Massman: "That is gorgeous! I'm heading over there to see more of her work!"


The winner of the Chipboard letters is....
Tanya said...

Beautiful layout! I have never heard of the Chip Art Collection tools, so cool. Love that "D", have never seen such an amazing chip board letter.Thanks for the chance. :)


Send me your info at hsonboul@gcdstudios.com AND place your prize info in the subject line :)

CONGRATS girls!

~H

------------------------------------------------------------------------------------------
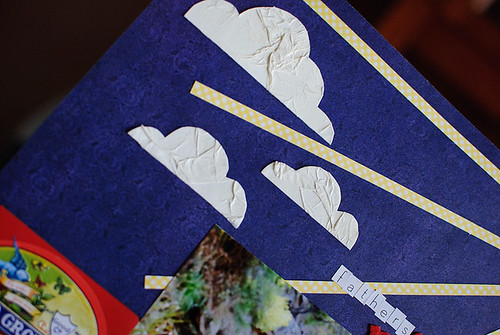
Hi, Kim here! It is my turn to share a technique with you and since in the northern hemisphere you are heading into summer, I thought I would share a great technique with you to create your own embellishments perfect for outdoor / summer pages - clouds.

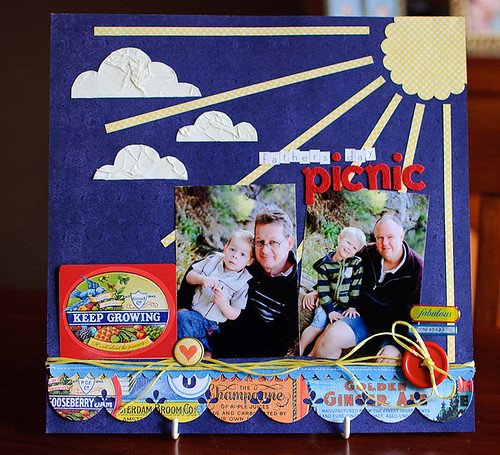
This is the layout that I created with the clouds I made using this technique ...

Technique - layout (1 of 4)

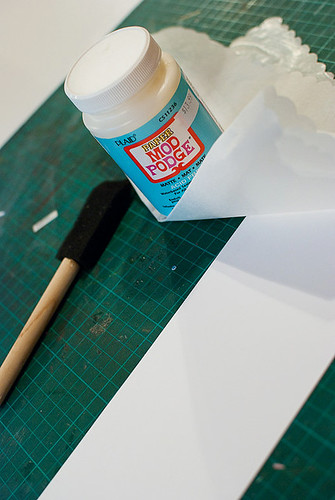
Step 1 - Gather your supplies: white cardstock, white tissue paper and mod podge

Technique step by step (1 of 11)

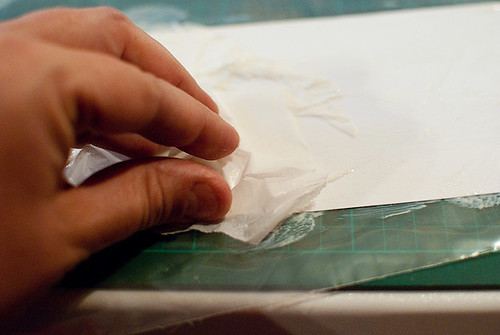
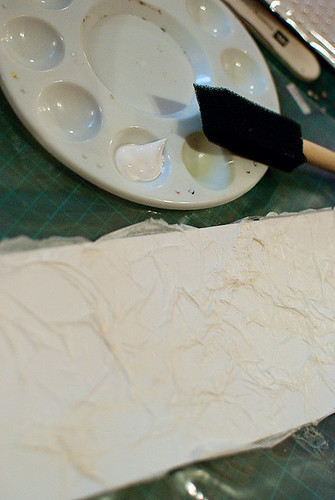
Step 2 - Using mod podge, crinkle and paste the tissue paper onto the cardstock

Technique step by step (4 of 11)

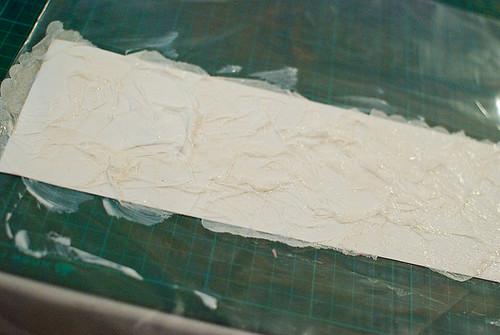
Step 3 - cover whole piece of cardstock using this technique and it will end up looking like this ...

Technique step by step (5 of 11)

Step 4 - set aside to dry. I left mine overnight.

Step 5 - I found it was creamer than I wanted when it dried, so I painted it with white paint and again set it aside to dry.

Technique step by step (6 of 11)


Technique step by step (7 of 11)

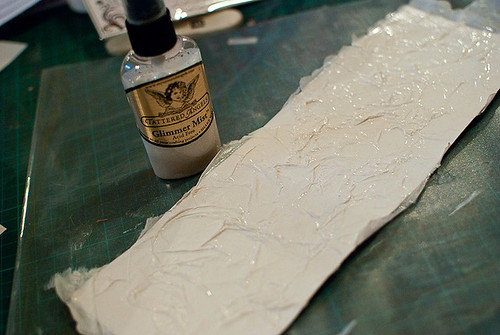
Step 6 - I then sprayed it with a pearl Glimmermist to make it shiny and again set it aside to dry.

Technique step by step (8 of 11)

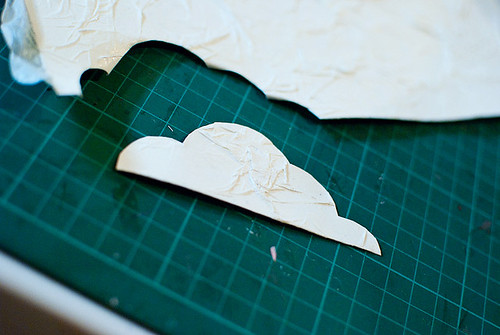
Step 7 - once it is dry, cut cloud shapes from it ...

Technique step by step (10 of 11)

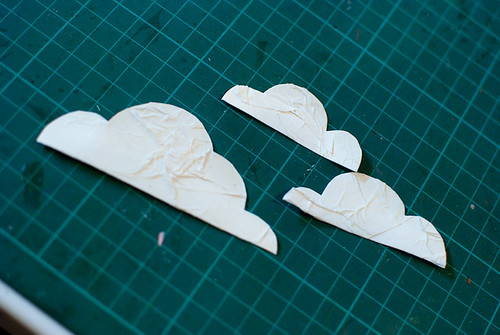
Step 8 - Cut the number of clouds that you want for your project and you are ready to go ...

Technique step by step (11 of 11)

I simply glued my clouds down, but you could also use foam tape to add even more dimension.

Technique - layout (2 of 4)

All products used for this layout are from the Artsy Urban range by Melody Ross for GCD Studios except for the letters which are American Crafts.

Cheers
Kim

6.14.2010

Wish me luck :)

I'm about to hop on a plane, because I'm teaching in Portland Oregon tomorrow. Sadly, it's not open to the public, because it's for scrapbook stores. I'm totally nerves to fly, because I'm flying at night. I normally take day trips.

Big Girls Don't Cry RIGHT?! lol

Anyways, I'll be teaching this
When I get back I'll share all the details. Wish me luck on my trip and that I won't freak out on the plane! haha
~H

Guest Designer & Hodge Podge Borders

first up today...
Here is a beautiful card from our GDA :)
Jacquie used our new Ava collection
Thanks Jacquie for this beautiful card.
Photobucket

-------------------------------------------------------------------------------------------
Hi all!

Teri here, and I'm excited to be back on the GCD Studios blog today.

I've got a fun Hodge Podge Border technique to share with you.

This is super easy technique. To pull it off, you are going to need:

* A circle punch

* Oval or circle Chip Art shapes

* Scissors

* Patterned paper from GCD Studios (of course!)

* Wet glue

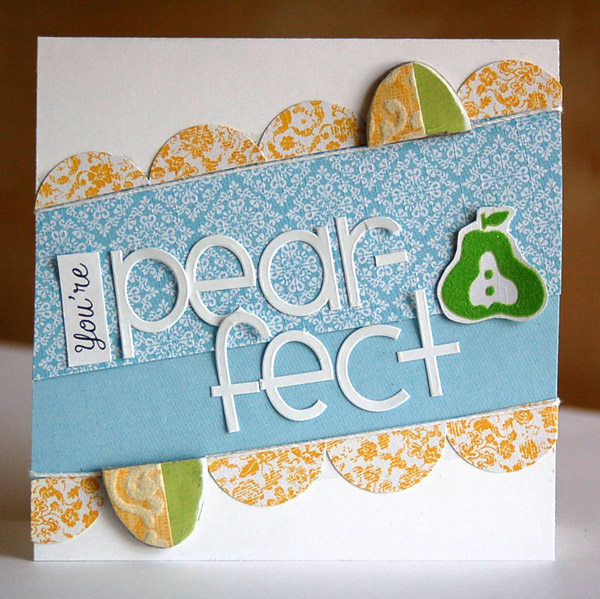
The first thing you are going to want to do is punch several circles from patterned paper. Cut several of them in half. Set aside a few half circles to use just as they are. Then, glue the rest of the half circles on top of your remaining circles. Once those half circles are adhered to the whole circles, cut them in half.

The process will look similar to this.


Now, set those circles aside and pull out some small circle and oval Chip Art chipboard shapes. Apply a thin layer of glue onto to the shapes and then place strips of patterned paper on them. Trim away the excess paper. Sand the shapes' edges (if desired) and then cut the shapes in half.

Your shapes will go from looking plain to something like this.


Now comes the fun part! You get to use the half circles. :)

To use them, simply line them up and you'll get a fun Hodge Podge border.

Here's a card where I used put together a Hodge Podge border using Chip Art chipboard shapes and solid half circles.


For this one, I several half circles that I didn't add anything extra to. I thought it made the chipboard pieces stand a little more.


And here is one more card I made with the Hodge Podge trick.


I used both kinds of circles, as well as ones made from Chip Art chipboard ovals, on this one. Because of that, I tinkered with the half circles quite a bit before adhering them permanently to the card. I wanted to make sure the patterns complimented each other well.


Something else that is fun to do with a Hodge Podge border is to make a banner for your card. Run the shapes in an angle along a piece of string. Add bows at each end. Add a celebratory sentiment and you are good to go.

That's all for now. I'll be back again soon!

Teri
for GCD Studios

6.13.2010

Dress it up with circles!

This month's theme was based on blue skies, fresh air, puffy white clouds....As soon as I saw the theme image, I knew I wanted to scrap one of the pictures I took last summer down at Pensacola Beach. It was a beautiful, hot summer day on the beach; the clouds were performing nicely; the water was sparkly blue...the perfect day. This picture depicts our beaches so beautifully – it really is paradise!


I used patterned papers from the “Zippity” Line by GCD. This line is full of blues, greens, & yellows – perfect for documenting the outdoors.


SUPPLIES USED:
Cardstock: Bazzill
Patterned Paper: GCD Studios
Border Punch: Martha Stewart
PopDots
Alphabet: American Crafts Thickers & Cosmo Cricket block alphas
Epoxy Stickers: GCD Studios Urban Artsy Line
Green Twine: Martha Stewart
Thread

6.12.2010

D is for Dad + Give away

Hi all, Mimi here again! This month Heidi challenged us to create a layout with these fabulous pictures as inspiration. I love all the different patterns of paper GCD Studios has with beautiful blues in them... these colors also work perfectly with Father's Day in June.

This is one of my favorite photos of my husband. I used this layout as a way to show him what a great Dad I think he is to our boys.


I also added a fun technique using the Chip Art Collection. Each time I use it I love it more.


For this letter D... I first used the Chip Art tools to stamp the image. Then I painted it with metallic blue paint. I love the shimmer it adds. I finally added just a dot of liquid adhesive to the center of each stamped image and sprinkled micro beans onto it. It has a great polka dot effect, not to mention lots of fun detail.


Leave a comment and on June 14th (Monday) I'll pick one winner.

These are the same letters that Mimi used

6.11.2010

A trip to Florida

For the month of June, the design team was given this image as inspiration:

The pretty blues in this collage gave me inspiration to work with some beach photos from a trip to Florida a couple years ago. I came up with this layout:


I used kraft Bazzill Swiss Dot cardstock for my base and it helped the GCD Studios Homespun Chic collection by Melody Ross just pop off the page. The colors matched the blue sky and our cabana perfectly.

Here's a close-up of part of the title using one of the chipboard phrases in the collection and a border strip.


I cut one of the transparencies apart and used some of it here with a brad and chipboard phrase. The patterned paper borders on the top and bottom of the layout are cut from the 8 x 8 paper pad.

Here's the rest of the title using one of the cards, transparency, brad and the crocheted flower is from the Artsy Urban collection.


Additional supplies used: (Maya Road pink ruffle trim, Bazzill Swiss Dot cardstock, Making Memories notebook paper, alphabet stickers)

Doesn't this make you want to go to Florida?! I know I could use another trip! :)

Jill

6.10.2010

I struggle with Father's Day!

Hello! I have a fabulous post for you today. I have to tell you, I struggle with Father's Day. Masculine style is hard for me to create. I do love my glitter, gems and lots and lots of pink. But I try to include Hubby in my creations, which is why, today, I am bringing the outside in.

Have you ever seen something from nature and wanted to use it for a decor item? Sometimes I add rocks, or leaves, or even sticks to my art. If you wash them ( if you can) or pick a nice green stem that is still supple, they work beautifully.

Think of all the natural items in the craft store you can buy: skeletonized leaves, sea shells, pebbles, dried flowers, etc.. Now think of the savings if you simply look in your back yard.

For this frame, I picked a nice twig that had fallen to the ground.


Supplies-( gcd studios artsy urban papers ( from 8x8 pad), artsy urban felt diecut borders, chip art tool set (mini shapes) chipboard birds ) other- letter stickers Reminisce, markers- sharpie, buttons and twine, paint, crackle medium, frame

First- Paint your frame cream, then crackle coat it, and repaint again with burnt sienna acrylic color. Allow to dry.

Remove glass from frame.

Cut pieces of blue paper to fit inside each frame. Then cut green paper into rectangle and mat with black paper.Add sticker letters to each rectangle. Foam tape back of rectangles and adhere to blue paper inside each frame.

Cut scallop border into pieces to fit the width of each frame. Adhere across green paper. Use ChipArt tool to deboss small star into several bird shapes, color with burnt sienna marker.

Take twig and see what position best fits across frame, if needed sand down spots where twig meets frame to better hold glue.Glue into place and allow to dry. Hand cut leaves of different papers, adhere to twig and frame in an artful way. :)

Tie bow with single button and knots in several more. Add to branch and letter A frame as shown.
Won't this make a great Father's Day gift for any dad! I sure hope I can keep my kids quite about it long enough to surprise my hubby!!

Have a great day!

kriste

6.09.2010

School is out (JOY, JOY)

Is it really June already?? School is out (JOY, JOY)(for most of you) and it's the month we celebrate the fathers in our lives. Both events are special in my book. I enjoy my kidlettes being out of school. We usually have a long to-do list each summer. So far on our list. We have vacation (to a never been before state), summer reading program at library, baseball, camping, voice lessons, volley ball camp, church camp, Florida trip, garden (it's actually growing famously). Sounds like a summer of fun!
Father's Day becomes more special each year as our children get older. I enjoy watching my hubby interact with kids in such a wonderful way. Our children have been blessed with a father who is active in their lives. He goes on field trips, attends field day, cooks for the school cook out, helps with baseball practice and games, he's a good provider, attends church each service, makes sure they get the proper discipline, I could go on and on. He really helps make my job as a mom a joyful experience.
The inspiration this month evokes such carefree feelings. I was really pulled in by the hot air balloons. By the way they float so haphazardly through the cloudless, deep blue sky with such ease and beauty. I can hardly tear my eyes away from the bold colors and patterns. It's almost breath taking.


Needless to say, my first card was inspired by the hot air balloons bold color and pattern. I pulled some paper from the Smoothie Shoppe and Lydia collections. I added a Melody Ross chipboard tag, some bling, a doily, and a Melody Ross button. The flower was created with a scalloped punch. I have a small tutorial for it in the works.

Below is a close-up of the flower. The paper used for the flower is called Pinas (smoothie shoppe and the stems are called Linen (lydia collection) .
This card has many elements seen in the photos. The scallops (cloud necklace), green colors ( balloon), stripes (balloon), blues (sky), orange, bronze accents (dirt road and fields). How fun is that. Talk about inspiration. It's amazing what you can get out of a few photos.
Patterned paper used for this card. Smoothie Shoppe and Homespun Chic.

Since this is the month we celebrate our fathers. And masculine cards seem to be a bit of challenge for me. I decided to create something really simple but fun. I started out with a plain Kraft card base. I wanted to make a frame using score lines. To do that. Punch a square and use it to mark each corner. Then simply connect the lines. I then stamped a smaller panel with a wood grain BG stamp. Adhered it to the center of the frame with pop dots. To create the tie, I used a square punch and a straight edge. The "knot" is a square cut in half with each angle tucked under. I then faux stitched around the edges.
Patterned paper is Diamonds from the Lydia collection.

TSM for bearing with me this long. I guess I got a little carried away with this month's challenge. I just couldn't seem to stop myself!
My last project is for my sweet daddy. He likes to fly little airplanes and he thinks Snoopy is funny. It also matches his office. Which in turn will make my momma happy.
The paper is form the Artsy Urban collection. I also used Melody Ross Chip Art Tool and chipboard. I colored in the stars and DAD with Copics.

I hope your summer has gotten off to a great start! C-ya next month. BOOM Time! :)

~lori