I'm excited to bring you my technique today. I guess you could say I was inspired by the bright and shiny necklace in the photo. And of course, I can't leave out the vibrant blue skies.
A light bulb came on when I was digging out possibilities for this month's challenge. I believe I was working on another project and had these two pieces of chipboard laying out on the table. For some reason they caught my eye and all I could see using them for was a robot. I could just envision his cute little boxy face. Almost immediately I went to work spray painting the little dude.
After mulling the idea around for a bit. I started thinking of supplies I already had on hand that I could use. Like pop cans. I washed a couple out before bed that night so they could be drying. Then the idea to use hardware came into play. So I dug around and found some in a kitchen drawer. All I had to do was dab some acrylic paint on them with tiny piece of a sponge.
Without further ado....Meet Ramsey the robot. I think he's such a cutie! He was so much fun to create. Hmmmm, maybe he needs a Mrs.?

Supplies: 2 pieces of medium plaques chip art chipboard (#551), blue redwork homespun chic paper, red and white card stock, 2 pop cans, silver metallic spray paint, 7 silver nuts (hardware), silver wire, 1/2 in. circle punch, rhinestone, stickers, blue acrylic paint, pen, hot glue gun, kid paintbrush, foam tape
Cut two 1 in. strips from one can for legs. Accordion fold and adhere.
Cut two 3/4 in. strips from 2nd can for arms. Accordion fold and adhere.

Create two rectangles from a piece of scrap aluminum.
One will be cut for the eyes. The other will remain uncut for the neck.

Cut one rectangle in half. Fold to create eyes. Make a small square
out of scrap aluminum. Fold to create a triangle for nose.
Also cut small rectangle for mouth.

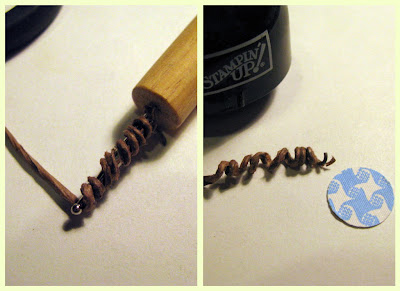
Wrap wire around end of paint brush to create antennae. 
Complete instructions:
- spray paint chipboard. allow to dry approx. 15 min. cut pop cans to create arms and legs
- accordion fold arms and legs. adhere.
- cut neck from scrap. adhere to head and body to connect. create eyes, nose and mouth. adhere.
- paint nuts. allow to dry approx. 15 min. once dry adhere.
- trace and cut middle panel. hand draw hearts, hands and feet. cut and adhere.
- affix stickers to card stock. cut and adhere.
- wrap wire around paintbrush. remove. punch out circle affix rhinestone. adhere to wire. adhere wire to robot.
- cut card stock to create card base. cut patterned paper slightly smaller than card stock and adhere. Adhere robot to card base using foam tape.
~lori


darling! what a fun idea!
ReplyDeleteHi Lori,
ReplyDeleteThat robot is one of the cutest things I've seen in a while....very creative.
Hugs,
Meri
This is sooooo darling Lori! Great re-purpose!
ReplyDeleteHow stinkin' CUTE is that robot!!! LOVE this and soooo creative!!
ReplyDeleteOh my gosh!! This is crazy cute!!
ReplyDeleteAbsolutely adorable-I want a whole family of them!
ReplyDeleteWOW !! How COOL is that ! I love the folds and you make it look so effortless !
ReplyDeleteOh my word!! This is incredibly adorable!
ReplyDeleteOh how cute! Love it!
ReplyDeleteFun project Lori!
ReplyDelete